今回はjupyter notebookやjupyterlab環境を複数名で利用する場合に便利なjupyterhub環境を構築してみようと思います。
jupyterhubはまずはデフォルト設定であるPAM Authenticators + LocalProcessSpawnerで構築しようと思います。
Authenticatorsに関してはこちら、Spawnerに関してはこちらを参照ください。

今までサーバーにjupyter notebookやjupyterlab環境を構築し、チームメンバーでアカウントをシェアし利用している方もいたかと思います。
Jupyterhubを使えば共通アカウントを使い回すことなく1つのサーバーにユーザーごとにのJupyter Notebook / Jupyterlabの環境を作成できます。
個別の環境を作成することによるメリットは下記があります。
・1つの環境を複数人で使い回すことによって誤ってコードを上書きしてしまうことがなくなる。
・ユーザーごとに仮想環境を構築しカーネルを切り替えて使うことが出来る。(利用者全体への影響を軽減する)
・(DockerSpawnerなどを使えば) メモリなどのリソースを制限することが出来るので特定のユーザーがメモリを使い潰すことを防げる
Jupyterhubをインストールする方法はいくつかあります。Jupyterhubの公式ページに載っていますが、わかりにくいのでまとめると下記になります。
- Zero to JupyterHub for Kubernetes (大規模向け、Kubernetes利用)
- The Littlest JupyterHub (0-100名向け、dockerへのインストールは非推奨)
- jupyerhubのDockerイメージから起動
- pipで一からjupyterhub環境を構築
それぞれの目的に沿う形で構築方法を選択してください。
私は10名程度のメンバー用にdockerのコンテナにjupyterhubを構築したかったので、3番か4番で構築する必要があったのだと思いますが、当時dockerイメージが提供されていることを知らず4番のみが選択肢でした 笑 (2020年ごろにありましたっけ?)
従って本記事では4番の方法を記載しています。公式イメージを利用しても大体同じような感じになるのではないかと思います。
ちなみに個人向けの場合はそもそもjupyterhubではなく、単純にjupyterlabかjupyternotebookを使う方が構築が簡単で良いかと思います。
本来はコマンドを一まとめにしてDockerfileでイメージをビルドしていたのですが、せっかくなのでステップバイステップで動作確認しながら構築していこうと思います。
jupyterhub環境をubuntu22.10に構築
docker runでコンテナの作成
# ubuntu22.10のイメージを利用
docker run -it -p 8000:8000 --name jupyterhub ubuntu:22.10
各パッケージを最新版にする
# Ubuntu22.10を最新にアップデート
root@f78e0be369ef: apt update && apt upgrade -yGet:1 http://security.ubuntu.com/ubuntu kinetic-security InRelease [90.7 kB] ・・・省略・・・ The following packages will be upgraded: apt base-passwd bash debianutils diffutils findutils gcc-12-base gpgv gzip libapt-pkg6.0 libaudit-common libaudit1 libc-bin libc6 libdebconfclient0 libgcc-s1 libgmp10 libgnutls30 libhogweed6 libnettle8 libp11-kit0 libpam-modules libpam-modules-bin libpam-runtime libpam0g libpcre2-8-0 libprocps8 libstdc++6 libsystemd0 libudev1 lsb-base procps sysvinit-utils usrmerge zlib1g 35 upgraded, 0 newly installed, 0 to remove and 0 not upgraded. Need to get 12.0 MB of archives. After this operation, 61.4 kB disk space will be freed. ・・・省略・・・ Processing triggers for libc-bin (2.36-0ubuntu3) ... Processing triggers for debianutils (5.7-0.3) ...
ロケールの変更 (日本時間にする)
export TZ=Asia/Tokyo
apt update && apt install locales dialog tzdata -y \
               && localedef -i ja_JP -c -f UTF-8 -A /usr/share/locale/locale.alias ja_JP.UTF-8 \
&& ln -snf /usr/share/zoneinfo/$TZ /etc/localtime && echo $TZ > /etc/timezoneHit:1 http://security.ubuntu.com/ubuntu kinetic-security InRelease ・・・省略・・・ The following NEW packages will be installed: dialog locales tzdata 0 upgraded, 3 newly installed, 0 to remove and 0 not upgraded. Need to get 4905 kB of archives. After this operation, 22.6 MB of additional disk space will be used. ・・・省略・・・ Setting up tzdata (2022c-1ubuntu3) ... ・・・省略・・・ Current default time zone: 'Asia/Tokyo' Local time is now: Wed Oct 5 20:33:07 JST 2022. Universal Time is now: Wed Oct 5 11:33:07 UTC 2022. Run 'dpkg-reconfigure tzdata' if you wish to change it. Setting up dialog (1.3-20211214-1) ...
途中tzdataの設定画面になります。
日本時間にする場合は、Geographic Area は 「Asia」を選択し、TimeZoneは「Tokyo」を選択してください。


# 時間を確認
root@f78e0be369ef: dateWed Oct 5 20:40:37 JST 2022
JST(日本時間)になっていますね。
# 日本語にしたい方はLANGの環境変数を設定しましょう
root@f78e0be369ef: export LANG=ja_JP.UTF-8
root@f78e0be369ef: export LANGUAGE=ja_JP:ja
root@f78e0be369ef: export LC_ALL=ja_JP.UTF-8
root@f78e0be369ef: date2022年 10月 5日 水曜日 20:42:39 JST
環境変数をbash_profileに追記
# ログインしたときに環境変数を設定するためbash_profileに追加し読み込む
root@f78e0be369ef: echo "export LANG=ja_JP.UTF-8">> ~/.bash_profile
root@f78e0be369ef: echo "export LANGUAGE=ja_JP:ja ">> ~/.bash_profile
root@f78e0be369ef: echo "export LC_ALL=ja_JP.UTF-8" >> ~/.bash_profile
root@f78e0be369ef: echo "export TZ=Asia/Tokyo" >> ~/.bash_profile
ここでターミナル上で日本語が入力できるか確認してください。
ターミナルで日本語入力が出来るかどうかを確認
# 日本語が入力できるか確認
root@f78e0be369ef: あいうえお
入力しても消えてしまうようであれば一度Cntl + P + Qを入力しコンテナから抜け出し、docker execコマンドでもう一度入り直してください。
(exitコマンドで抜け出すとコンテナがstopします。その時はdocker start jupyterhubコマンドで再起動してください。)
# コンテナにdocker execコマンドで入る
root@f78e0be369ef: docker exec -it jupyterhub /bin/bash --login
# 日本語入力できるか確かめる
root@f78e0be369ef: あいうえおbash: あいうえお: command not found
入力できるようになりました。Dockerfileでイメージをビルドしている場合は入り直すという作業はいらなかったと思います。
ユーザーの作成
# jupyterhubのadminユーザーの作成 (hinomarucというユーザーを作成します)
root@f78e0be369ef: export PASSWORD=hinomaruc
root@f78e0be369ef: useradd -s /bin/bash --uid 2525 -m hinomaruc && echo -e "${PASSWORD}\n${PASSWORD}" | passwd hinomarucNew password: Retype new password: passwd: password updated successfully
ユーザー名とパスワードが「hinomaruc」のユーザーを作成しました。
後ほどjupyterhubのコンフィグファイルでhinomarucユーザーをjupyterhubの管理者に設定します。
# hinomarucユーザーが存在するか確認
root@f78e0be369ef: cat /etc/group | grep hinomaruchinomaruc:x:2525:
作成されていました。
sudoコマンドのインストールとsudoグループへの追加
# sudoコマンドが初期設定だとインストールされていないので追加する
root@f78e0be369ef: apt install sudo -yReading package lists... Done ・・・省略・・・ The following NEW packages will be installed: dbus dbus-bin dbus-daemon dbus-session-bus-common dbus-system-bus-common dmsetup gir1.2-glib-2.0 krb5-locales libapparmor1 libargon2-1 libcryptsetup12 libdbus-1-3 libdevmapper1.02.1 libexpat1 libfdisk1 libgirepository-1.0-1 libglib2.0-0 libglib2.0-data libgssapi-krb5-2 libicu71 libip4tc2 libjson-c5 libk5crypto3 libkeyutils1 libkmod2 libkrb5-3 libkrb5support0 libmpdec3 libnsl2 libpython3-stdlib libpython3.10-minimal libpython3.10-stdlib libreadline8 libsqlite3-0 libssl3 libsystemd-shared libtirpc-common libtirpc3 libxml2 media-types networkd-dispatcher python3 python3-dbus python3-gi python3-minimal python3.10 python3.10-minimal readline-common shared-mime-info sudo systemd systemd-resolved systemd-timesyncd xdg-user-dirs 0 upgraded, 54 newly installed, 0 to remove and 0 not upgraded. Need to get 29.8 MB of archives. After this operation, 104 MB of additional disk space will be used.
# hinomarucユーザーをsudoグループに追加する
root@f78e0be369ef: gpasswd -a hinomaruc sudoAdding user hinomaruc to group sudo
root@f78e0be369ef: cat /etc/group | grep sudosudo:x:27:hinomaruc
追加されました。sudoグループを使わなくても独自グループを作成しても問題ありません。
グループ追加の例
groupadd -g 5151 myadmins
echo "%myadmins ALL=(ALL:ALL) ALL" >> /etc/sudoers
各種コマンドやパッケージのインストール
# とりあえず思い当たる各種パッケージのインストール
root@f78e0be369ef: apt update && apt install -y vim iputils-ping net-tools wget curl \
                                 npm python3 python3-dev python3-pip python3-venv python3-pycurl \
                                 build-essential cmake clang libaio1 libffi-dev libfreetype-dev libpq-dev \
                                 && apt install -y --no-install-recommends fonts-noto-cjk \
&& apt autoremove -y && apt clean && rm -rf /var/lib/apt/lists/*Hit:1 http://security.ubuntu.com/ubuntu kinetic-security InRelease ・・・省略・・・ python3 is already the newest version (3.10.6-1). ・・・省略・・・ 0 upgraded, 723 newly installed, 0 to remove and 0 not upgraded. Need to get 325 MB of archives. After this operation, 1,540 MB of additional disk space will be used. ・・・省略・・・ The following NEW packages will be installed: fonts-noto-cjk 0 upgraded, 1 newly installed, 0 to remove and 0 not upgraded. Need to get 61.2 MB of archives. After this operation, 93.2 MB of additional disk space will be used. ・・・省略・・・
# jupyterhubのインストール
root@f78e0be369ef: python3 -m pip install --upgrade pip \
                && python3 -m pip install --upgrade jupyterhub notebook jupyterlab \
                && python3 -m pip install netifaces \
                && npm install -g configurable-http-proxy
Requirement already satisfied: pip in /usr/lib/python3/dist-packages (22.2)
・・・省略・・・
Installing collected packages: webencodings, wcwidth, Send2Trash, pytz, pure-eval, ptyprocess, pickleshare, pamela, mistune, json5, ipython-genutils, fastjsonschema, executing, backcall, websocket-client, urllib3, traitlets, tornado, tomli, tinycss2, soupsieve, sniffio, ruamel.yaml.clib, pyzmq, python-json-logger, python-dateutil, pyrsistent, pyparsing, pycparser, psutil, prompt-toolkit, prometheus-client, pexpect, parso, pandocfilters, oauthlib, nest-asyncio, MarkupSafe, jupyterlab-pygments, idna, greenlet, entrypoints, defusedxml, decorator, debugpy, charset-normalizer, certifi, bleach, babel, attrs, async-generator, asttokens, terminado, stack-data, SQLAlchemy, ruamel.yaml, requests, packaging, matplotlib-inline, Mako, jupyter-core, jsonschema, jinja2, jedi, cffi, beautifulsoup4, anyio, nbformat, jupyter-telemetry, jupyter-client, ipython, cryptography, argon2-cffi-bindings, alembic, pyopenssl, nbclient, ipykernel, argon2-cffi, nbconvert, certipy, notebook, jupyterhub, jupyter-server, notebook-shim, jupyterlab-server, nbclassic, jupyterlab
Successfully installed Mako-1.2.3 MarkupSafe-2.1.1 SQLAlchemy-1.4.41 Send2Trash-1.8.0 alembic-1.8.1 anyio-3.6.1 argon2-cffi-21.3.0 argon2-cffi-bindings-21.2.0 asttokens-2.0.8 async-generator-1.10 attrs-22.1.0 babel-2.10.3 backcall-0.2.0 beautifulsoup4-4.11.1 bleach-5.0.1 certifi-2022.9.24 certipy-0.1.3 cffi-1.15.1 charset-normalizer-2.1.1 cryptography-38.0.1 debugpy-1.6.3 decorator-5.1.1 defusedxml-0.7.1 entrypoints-0.4 executing-1.1.0 fastjsonschema-2.16.2 greenlet-1.1.3 idna-3.4 ipykernel-6.16.0 ipython-8.5.0 ipython-genutils-0.2.0 jedi-0.18.1 jinja2-3.1.2 json5-0.9.10 jsonschema-4.16.0 jupyter-client-7.3.5 jupyter-core-4.11.1 jupyter-server-1.19.1 jupyter-telemetry-0.1.0 jupyterhub-3.0.0 jupyterlab-3.4.8 jupyterlab-pygments-0.2.2 jupyterlab-server-2.15.2 matplotlib-inline-0.1.6 mistune-2.0.4 nbclassic-0.4.4 nbclient-0.6.8 nbconvert-7.1.0 nbformat-5.6.1 nest-asyncio-1.5.6 notebook-6.4.12 notebook-shim-0.1.0 oauthlib-3.2.1 packaging-21.3 pamela-1.0.0 pandocfilters-1.5.0 parso-0.8.3 pexpect-4.8.0 pickleshare-0.7.5 prometheus-client-0.14.1 prompt-toolkit-3.0.31 psutil-5.9.2 ptyprocess-0.7.0 pure-eval-0.2.2 pycparser-2.21 pyopenssl-22.1.0 pyparsing-3.0.9 pyrsistent-0.18.1 python-dateutil-2.8.2 python-json-logger-2.0.4 pytz-2022.4 pyzmq-24.0.1 requests-2.28.1 ruamel.yaml-0.17.21 ruamel.yaml.clib-0.2.6 sniffio-1.3.0 soupsieve-2.3.2.post1 stack-data-0.5.1 terminado-0.16.0 tinycss2-1.1.1 tomli-2.0.1 tornado-6.2 traitlets-5.4.0 urllib3-1.26.12 wcwidth-0.2.5 webencodings-0.5.1 websocket-client-1.4.1
WARNING: Running pip as the 'root' user can result in broken permissions and conflicting behaviour with the system package manager. It is recommended to use a virtual environment instead: https://pip.pypa.io/warnings/venv
Collecting netifaces
  Downloading netifaces-0.11.0.tar.gz (30 kB)
  Preparing metadata (setup.py) ... done
Building wheels for collected packages: netifaces
  Building wheel for netifaces (setup.py) ... done
  Created wheel for netifaces: filename=netifaces-0.11.0-cp310-cp310-linux_x86_64.whl size=34761 sha256=a19dbee737d25ede7664451aaaf2fea4b5e00bb68ed113c4b546061c8e150072
  Stored in directory: /root/.cache/pip/wheels/48/65/b3/4c4cc6038b81ff21cc9df69f2b6774f5f52e23d3c275ed15aa
Successfully built netifaces
Installing collected packages: netifaces
Successfully installed netifaces-0.11.0
WARNING: Running pip as the 'root' user can result in broken permissions and conflicting behaviour with the system package manager. It is recommended to use a virtual environment instead: https://pip.pypa.io/warnings/venv

added 39 packages, and audited 40 packages in 7s

3 packages are looking for funding
  run npm fund for details

found 0 vulnerabilities
jupyterhubの設定
# 設定ファイル格納用
root@f78e0be369ef: mkdir -p /etc/jupyterhub && mkdir -p /etc/jupyter
# jupyterhubの画面上でユーザーを追加する時に実行するスクリプト
# ユーザー名を画面から入力するとsudoグループに追加されたユーザーが追加される。(パスワードは固定)
root@f78e0be369ef: cat << 'EOF' > /etc/jupyterhub/add_user.sh
#!/bin/bash
USERNAME=""
PASSWORD="password"
# ユーザー追加、パスワード固定
useradd -s /bin/bash -m ${USERNAME} && echo -e "${PASSWORD}\n${PASSWORD}" | passwd ${USERNAME}
# sudoグループに追加
gpasswd -a ${USERNAME} sudo
EOF
# 権限変更しておかないと画面からユーザー追加したときにエラーになる
root@f78e0be369ef: chmod 775 /etc/jupyterhub/add_user.sh# jupyterhubのconfigを作成して編集する。
root@f78e0be369ef: cd /etc/jupyterhub && jupyterhub --generate-config
# もしくは下記コマンドを実行する。
# (jupyterhubを動かすのに必要なやつだけ追記)
root@f78e0be369ef: cat << 'EOF' > /etc/jupyterhub/jupyterhub_config.py
c = get_config() # noqa
c.LocalAuthenticator.create_system_users=True
c.LocalAuthenticator.add_user_cmd=['/etc/jupyterhub/add_user.sh']
c.PAMAuthenticator.admin_groups = {'sudo'}
import netifaces
c.JupyterHub.hub_connect_ip = netifaces.ifaddresses('eth0')[netifaces.AF_INET][0]['addr']
c.JupyterHub.hub_id = '0.0.0.0'
c.Spawner.default_url = '/lab'
c.Authenticator.admin_users={'hinomaruc'}
EOF# cull_idleの設定。jupyterhub側のconfigでもパッケージ追加で可能だが、こちらで設定する方が安定していた。
root@f78e0be369ef: cat << 'EOF' > /etc/jupyter/jupyter_notebook_config.py
# 30日 非アクティブのJupyterサーバーのシャットダウン期限
c.NotebookApp.shutdown_no_activity_timeout = 30 * 24 * 60 * 60
# 3日 カーネルのシャットダウン期限
c.MappingKernelManager.cull_idle_timeout = 3 * 24 * 60 * 60
# 1時間 シャットダウンするかどうかの確認インターバル
c.MappingKernelManager.cull_internal = 60 * 60
EOFpython3.7のビルドとインストール
# Ubuntu22.10でデフォルトでインストールされているのがPython3.10なので、新しいバージョンのPythonに対応していないライブラリ用に3.7もインストールしていく。
cd /opt && wget https://www.python.org/ftp/python/3.7.10/Python-3.7.10.tar.xz && tar xvf Python-3.7.10.tar.xz \
&& cd Python-3.7.10 && ./configure && make altinstall--2022-10-06 13:31:18-- https://www.python.org/ftp/python/3.7.10/Python-3.7.10.tar.xz Resolving www.python.org (www.python.org)... 146.75.112.223, 2a04:4e42:8c::223 Connecting to www.python.org (www.python.org)|146.75.112.223|:443... connected. HTTP request sent, awaiting response... 200 OK Length: 17392580 (17M) [application/octet-stream] Saving to: ‘Python-3.7.10.tar.xz’ ・・・省略・・・ copying build/scripts-3.7/pydoc3.7 -> /usr/local/bin copying build/scripts-3.7/pyvenv-3.7 -> /usr/local/bin copying build/scripts-3.7/idle3.7 -> /usr/local/bin copying build/scripts-3.7/2to3-3.7 -> /usr/local/bin changing mode of /usr/local/bin/pydoc3.7 to 755 changing mode of /usr/local/bin/pyvenv-3.7 to 755 changing mode of /usr/local/bin/idle3.7 to 755 changing mode of /usr/local/bin/2to3-3.7 to 755 ・・・省略・・・ Installing collected packages: setuptools, pip Successfully installed pip-20.1.1 setuptools-47.1.0
# python3.7の確認
root@f78e0be369ef: python3.7 -VPython 3.7.10
無事インストールされているようです。ちなみにPython3コマンドは3.10を指しています。
# python3の確認
root@f78e0be369ef: python3 -VPython 3.10.7
ここまででjupyterhubの環境構築は完了です。それでは起動してみましょう。
jupyterhubの起動
# jupyterhubの起動
root@f78e0be369ef: mkdir -p /var/log/jupyterhub
root@f78e0be369ef: cd /etc/jupyterhub && jupyterhub -f /etc/jupyterhub/jupyterhub_config.py >> /var/log/jupyterhub/jupyterhub.log 2>&1
ログファイルは肥大化しやすいので、実業務ではログローテーションの設定を追加した方が良いです。
jupyterhubの動作確認
構築ではなく、実際にjupyterhubの画面を触って動作確認してみます。
ログイン画面にアクセス ((http://localhost:8000)
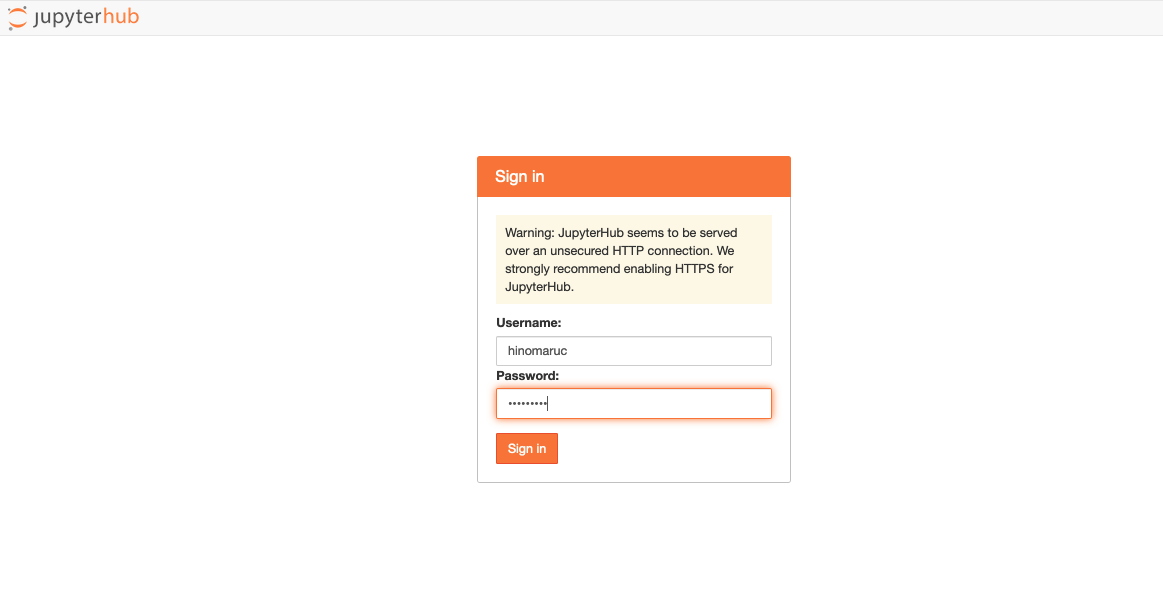
作成したhinomarucユーザーでログインします。パスワードもhinomarucです。
top画面 (http://localhost:8000/user/hinomaruc/lab)
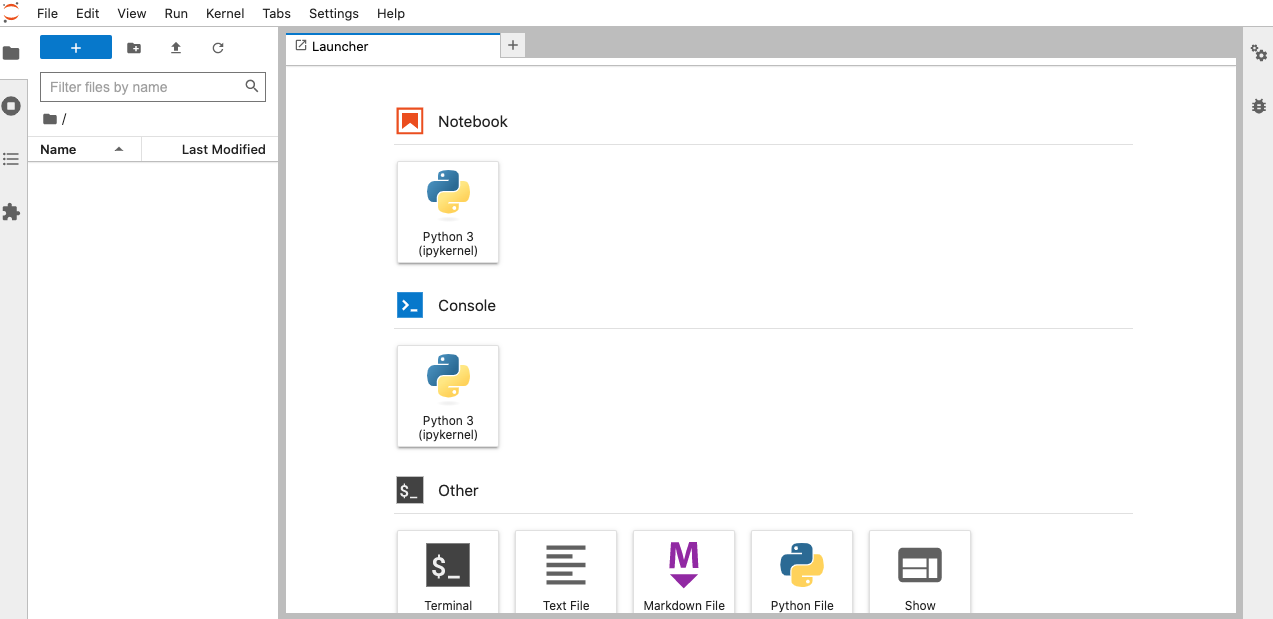
jupyterlabの画面です。
configファイルで、c.Spawner.default_url = '/lab' にした為、http://localhost:8000/user/hinomaruc/lab というURLに飛ぶようになっています。
jupyternotebookのインターフェイスがいいという方(私です 笑)は、http://localhost:8000/user/hinomaruc/tree にアクセスするとjupyternotebookの画面になります。
jupyter notebookの画面 (http://localhost:8000/user/hinomaruc/tree)
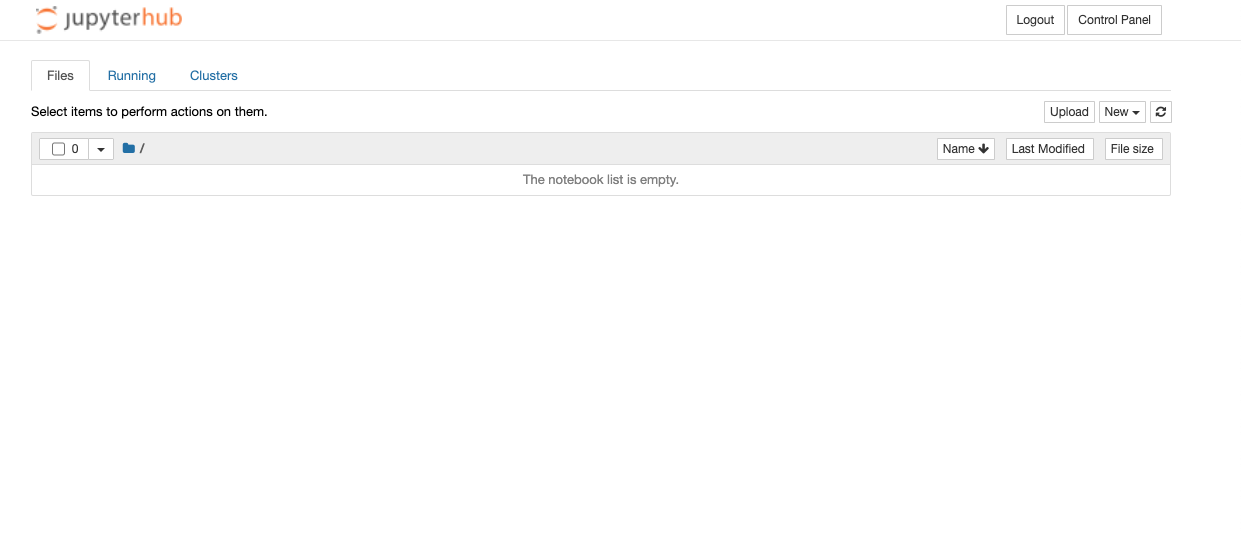
見慣れた画面で安心しますね 笑
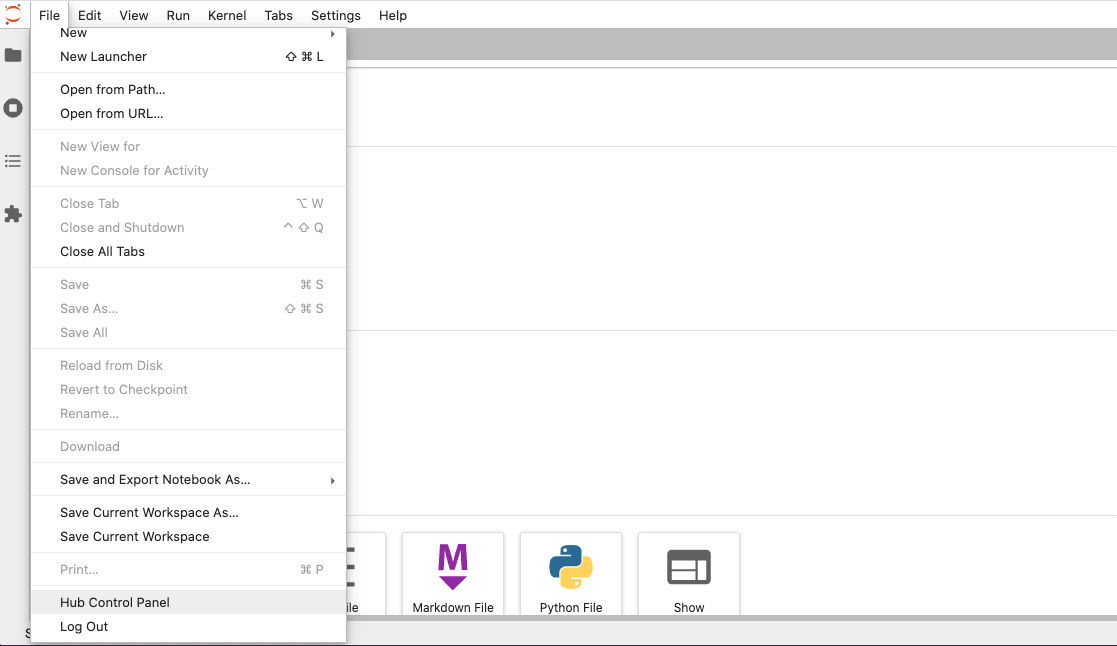
jupyterhubのコントロールパネルへアクセス (http://localhost:8000/hub/home)
メニューのFile → Hub Control Panelリンクを押すとjupyterhubのコントロールパネル画面に飛びます。
発行済みトークンや自分のjupyterサーバーをstartしたりstop出来たりします。
管理者画面にアクセス (http://localhost:8000/hub/admin#/)
jupyterhubのコントロールパネルにあるAdminタブをクリックするとアクセス出来ます。
管理者以外はアクセス出来ません。
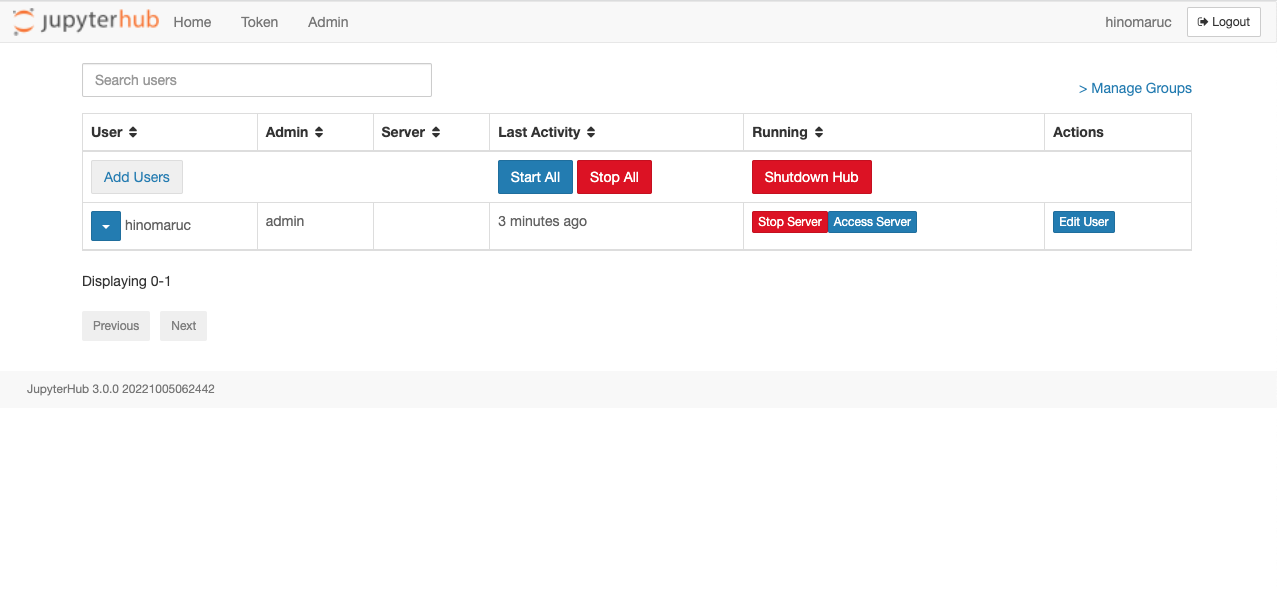
ユーザー管理機能があります。特定ユーザーのjupyterサーバーをstopさせたり、新規ユーザーを「Add Users」ボタンから追加出来ます。
新規ユーザーの追加
5番の管理者画面にある「Add Users」ボタンを押下します。
c.LocalAuthenticator.add_user_cmd=['/etc/jupyterhub/add_user.sh'] で設定したシェルファイルの処理が呼ばれます。
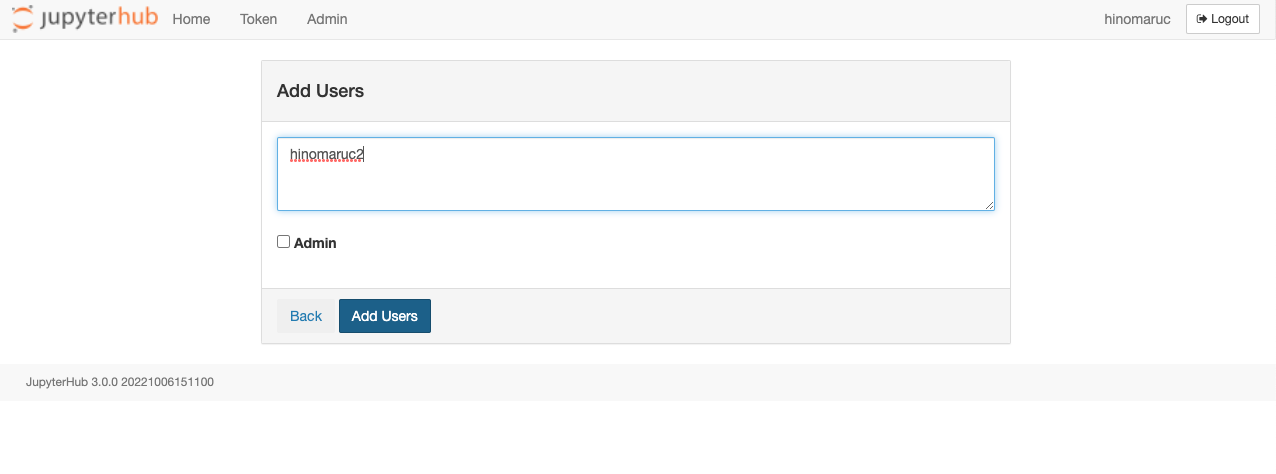
試しにhinomaruc2というユーザーをnon adminで追加してみました。
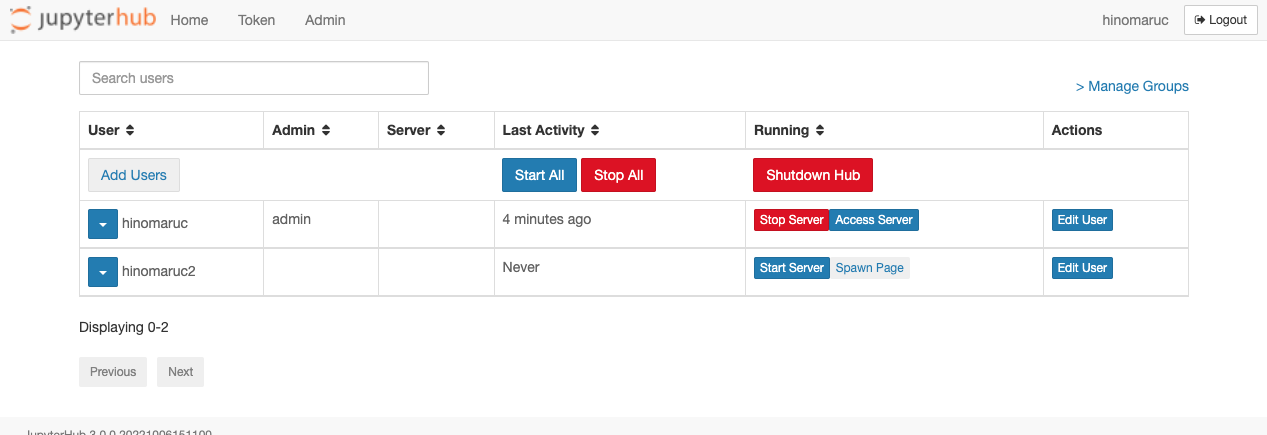
hinomaruc2ユーザーが追加されていますね。
groupの作成とユーザーの追加
いつの間にかjupyterhubにグループ機能が追加されていました。
特定のグループ内のメンバーだけ管理者画面に表示して制御するといった複雑な権限設定が可能なようです。
例えば下記のような設定で、
・instructors-data8は管理者ページで・・・
・students-data8グループのメンバーを表示可能
・students-data8グループのメンバーのサーバーを止めたり動かしたり出来る
・students-data8グループのメンバーのサーバーにアクセスすることが出来る
 c.JupyterHub.load_roles = [
  {
    "name": "instructor-data8",
    "scopes": [
      # access to the admin page
      "admin-ui",
      # list users in the class group
      "list:users!group=students-data8",
      # start/stop servers for users in the class
      "admin:servers!group=students-data8",
      # access servers for users in the class
      "access:servers!group=students-data8",
    ],
    "group": ["instructors-data8"],
  }
]
引用: https://jupyterhub.readthedocs.io/en/stable/rbac/scopes.html
完全に高校や大学などでの利用を想定していますね。これは講師が利用するには便利ですね。
グループの追加方法は、管理者画面の右上に「Manage Groups」リンクがあるので押下します。
(http://localhost:8000/hub/admin#/groups へ飛びます)
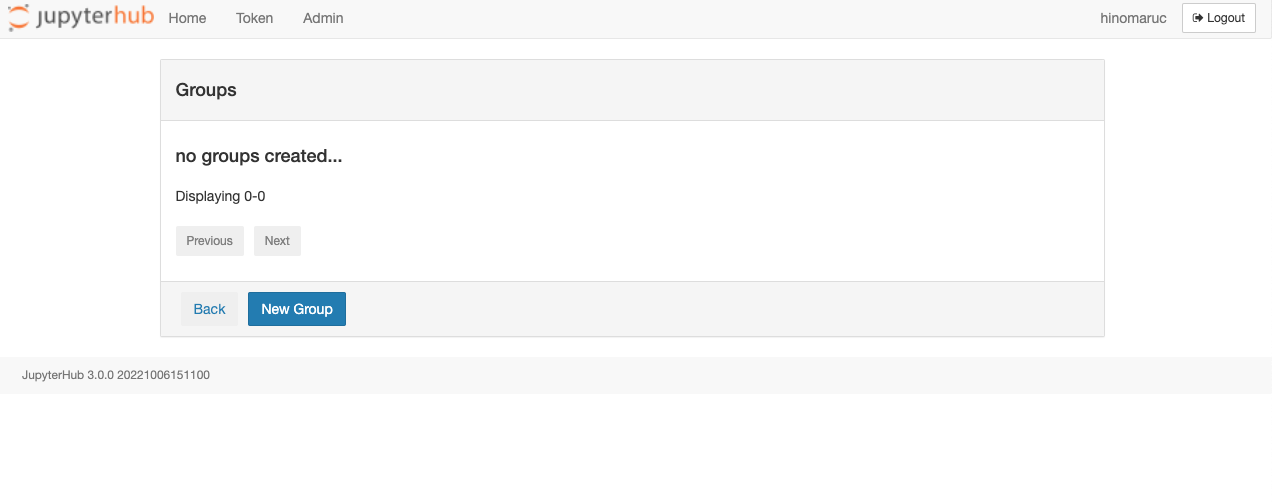
遷移先の画面で「New Group」ボタンをクリックします。
私はお試しで「test-group」というグループを作成しました。
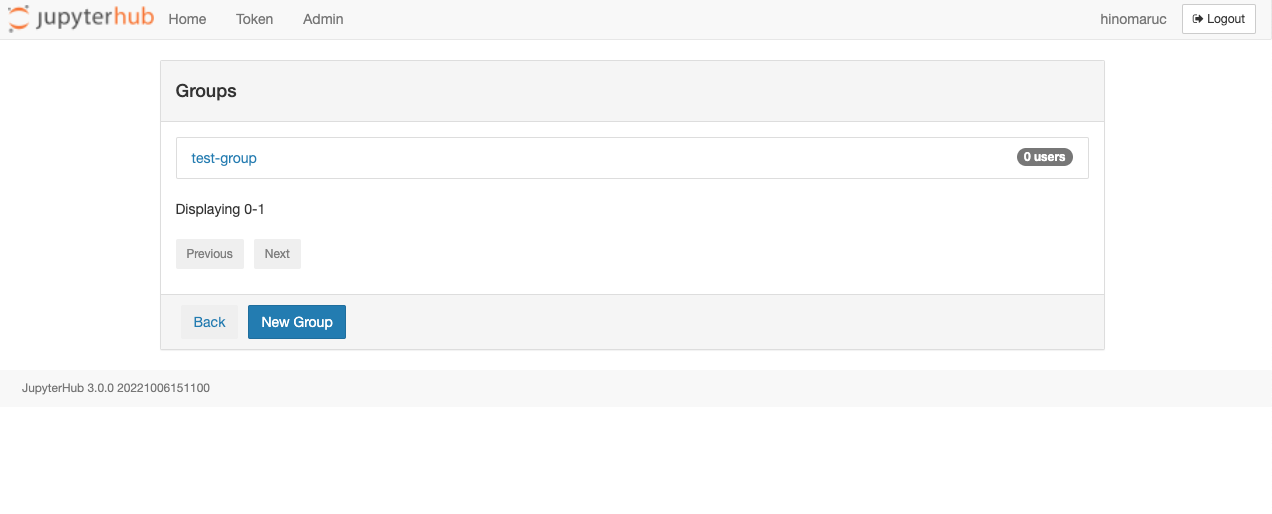
グループにユーザーを追加する方法は、グループ一覧画面 (http://localhost:8000/hub/admin#/groups) でグループ名がリンクになっているので押下します。
そうするとグループ編集の画面に遷移します。(http://localhost:8000/hub/admin#/group-edit)
追加したユーザー名を検索ボックスから探し、「Add user」ボタンを押下します。
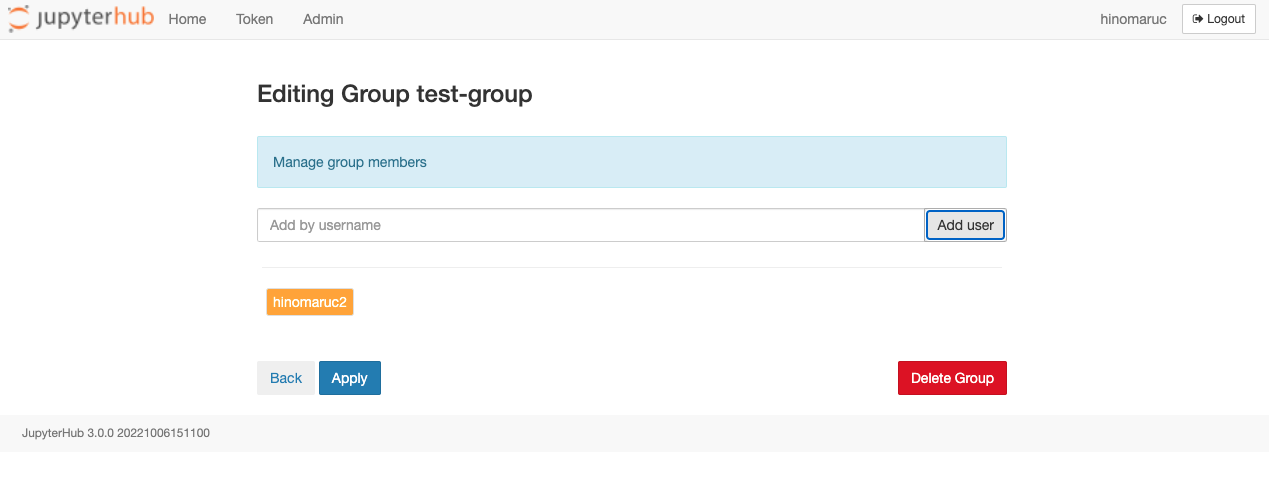
まだconfigに何も追加していないので、あまり意味はありませんが教育の場や企業で権限管理するにはすばらしい機能ですね。
まとめ
いかがでしたでしょうか?意外と簡単に構築できましたね。
今回はPAM Authenticators + LocalProcessSpawnerでjupyterhubを構築しましたが、githubやgoogleのアカウントを利用して認証したり、分析ライブラリインストール済みのdockerイメージを最初から利用するなども可能なのでぜひ利用してみてください。