AutoMLは機械学習のプロセス(データ加工〜モデル作成〜ハイパーパラメータチューニング)を全て自動実行してくれるツールになります。
有名なものだと、DataRobotというツールがありますが有償になります。
Pythonで無償で使えるものだとmljar・AutoGluon・auto-sklearnなどのライブラリが存在します。
mljarの公式サイトに、Kaggleのデータセットで複数のAutoMLライブラリの性能を比較した結果がまとめられています。
AutoMLを利用すれば下手に自分でやるより精度がいいモデルを作成することができるかもしれません。
分析用のデータを作成する作業が省略することは難しいかもしれませんが、その後の作業が自動化されると業務時間がかなり短縮出来そうですね。
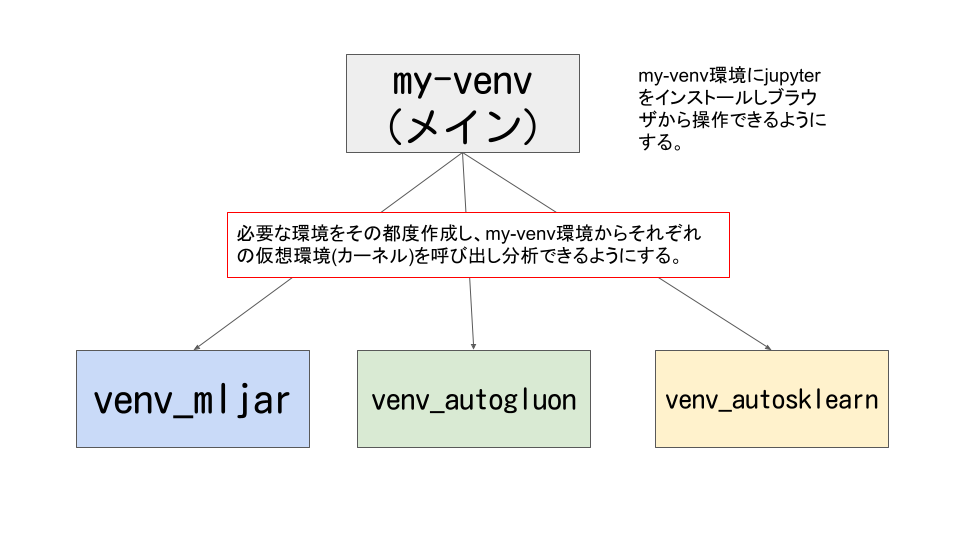
ちなみにそれぞれのAutoMLライブラリは必要なPythonのバージョンやパッケージが異なることがあるので、競合しないように個々のAutoMLライブラリごとに仮想環境を構築することをおすすめします。
jupyter notebook上で複数の仮想環境を切り替える方法は別記事にまとめてあります。
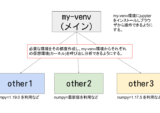
最終的なイメージは下記になります。
今回は長くなってしまうので、mljarの構築方法になります。
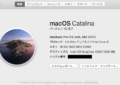
構築確認環境
Mac OS 10.15.7 (maxOS Catalina)
python3 -VPython 3.8.2
Macbookで元から入っているpythonです。
しかしこちらは使わずにbrewからPython3.8をインストールしました。
理由はautomlの依存関係をインストール時にソースのビルドが発生する場合、元から入っているPythonだとエラーになるライブラリがあったためです。
例えば下記のようなエラーです。
Building wheel for shap (setup.py) ... error
python3.8 (brew) をインストール
ということでbrewからpython3.8をインストールします。
# python3.8をbrewでインストールする
brew install python@3.8
# シンボリックリンクをはる
ln -s /usr/local/opt/python@3.8/bin/python3.8 /usr/local/bin/python3.8
# バージョンの確認
python3.8 -VPython 3.8.13
brewのpython3.8をインストールできました。
メイン環境の作成 (my-venv)
作成済みの方はスキップしてください。
# my-venvという名前の仮想環境を作成 (brewのpython3.8を使用)
python3.8 -m venv my-venv
# activateにする
source my-venv/bin/activate
# pip・wheel・setuptoolsのインストールもしくはアップグレード
(my-venv) % python3 -m pip install --upgrade pip wheel setuptools
# jupyterのインストール
(my-venv) % python3 -m pip install jupyter sklearn
# (オプション) nbextensionをenableにする。※ automlモデル作成時にエラーが出る場合
(my-venv) % python3 -m jupyter nbextension enable --py widgetsnbextensionmljarの仮想環境を作成する
mljarの仮想環境作成
# venv-mljarという名前の仮想環境を作成
python3.8 -m venv venv-mljar

# activateし仮想環境内に入る (venv-mljar/bin/python3 -m ~ でコマンドを実行してもOK)
source venv-mljar/bin/activate

# pip、wheel,setuptoolsのインストールもしくはアップグレード
(venv-mljar) % python3 -m pip install pip wheel setuptools --upgrade
mljar-supervisedのインストール
# mljarのインストール
(venv-mljar) % python3 -m pip install mljar-supervised
何もなければそのままインストールが完了します。
Collecting mljar-supervised
・・・省略・・・
Successfully installed Mako-1.2.0 MarkupSafe-2.1.1 PrettyTable-3.3.0 PyYAML-6.0 alembic-1.8.0 attrs-21.4.0 autopage-0.5.1 catboost-1.0.6 category-encoders-2.5.0 cliff-3.10.1 cmaes-0.8.2 cmd2-2.4.1 colorlog-6.6.0 colour-0.1.5 cycler-0.11.0 dtreeviz-1.3.6 fonttools-4.33.3 graphviz-0.20 greenlet-1.1.2 importlib-metadata-4.11.4 importlib-resources-5.7.1 iniconfig-1.1.1 joblib-1.1.0 kiwisolver-1.4.2 lightgbm-3.3.2 llvmlite-0.38.1 markdown-3.3.7 matplotlib-3.5.2 mljar-supervised-0.11.2 numba-0.55.2 numpy-1.22.4 optuna-2.10.0 packaging-21.3 pandas-1.4.2 patsy-0.5.2 pbr-5.9.0 pillow-9.1.1 plotly-5.8.0 pluggy-1.0.0 py-1.11.0 pyparsing-3.0.9 pyperclip-1.8.2 pytest-7.1.2 python-dateutil-2.8.2 pytz-2022.1 scikit-learn-1.1.1 scikit-plot-0.3.7 scipy-1.8.1 seaborn-0.11.2 shap-0.36.0 six-1.16.0 slicer-0.0.7 sqlalchemy-1.4.37 statsmodels-0.13.2 stevedore-3.5.0 tabulate-0.8.9 tenacity-8.0.1 threadpoolctl-3.1.0 tomli-2.0.1 tqdm-4.64.0 typing-extensions-4.2.0 wcwidth-0.2.5 wordcloud-1.8.1 xgboost-1.6.1 zipp-3.8.0
ipykernelをインストール
my-venvのjupyter notebookから今回作成したvenv_mljarの仮想環境を呼び出せるようにします。
(venv-mljar) % python3 -m pip install ipykernel
(venv-mljar) % python3 -m ipykernel install --user --name venv_mljar --display-name "venv_mljar"Installed kernelspec venv_mljar in /Users/hinomaruc/Library/Jupyter/kernels/venv_mljar
mljarの動作確認
お馴染みボストンの住宅価格のデータセットをサンプルとしてautomlしてみます。
# 必要なライブラリをインポート
import pandas as pd
import numpy as np
from sklearn.model_selection import train_test_split
from supervised.automl import AutoML
# データセットをデータフレームに読み込む
df = pd.read_csv("http://lib.stat.cmu.edu/datasets/boston_corrected.txt", encoding='Windows-1252',skiprows=9,sep="\t")# 分析用の説明変数を選択しておく
anacols=[
'CRIM' # 1人当たりの犯罪数
, 'ZN' # 町別の25,000平方フィート(7600m2)以上の住居区画の割合
, 'INDUS' #町別の非小売業が占める土地面積の割合
, 'CHAS' # チャールズ川沿いかどうか
, 'NOX' # 町別の窒素酸化物の濃度(1000万分の1)
, 'RM' # 住居の平均部屋数
, 'AGE' # 持ち家住宅比率
, 'DIS' # 5つのボストン雇用センターへの重み付き距離
, 'RAD' # 町別の環状高速道路へのアクセスのしやすさ
, 'TAX' # 町別の$10,000ドルあたりの固定資産税率
, 'PTRATIO' #町別の生徒と先生の比率
, 'B' # 1000*(黒人人口割合 - 0.63)^2
, 'LSTAT' # 貧困人口割合
]# Xとyの作成
X = df[anacols] # 説明変数
y = df["CMEDV"] # 目的変数# 訓練データとテストデータへ分割する
X_train, X_test, y_train, y_test = train_test_split(X, y, test_size=0.2, random_state=100)# mljarのautomlモデルを作成
automl = AutoML()
automl.fit(X_train,y_train)
    AutoML directory: AutoML
    The task is regression with evaluation metric rmse
    AutoML will use algorithms: ['Baseline', 'Linear', 'Decision Tree', 'Random Forest', 'Xgboost', 'Neural Network']
    AutoML will ensemble available models
    AutoML steps: ['simple_algorithms', 'default_algorithms', 'ensemble']
    * Step simple_algorithms will try to check up to 3 models
    1_Baseline rmse 8.180234 trained in 0.6 seconds
    2_DecisionTree rmse 5.104858 trained in 14.72 seconds
    3_Linear rmse 5.511379 trained in 3.5 seconds
    * Step default_algorithms will try to check up to 3 models
    4_Default_Xgboost rmse 3.352659 trained in 4.74 seconds
    5_Default_NeuralNetwork rmse 3.606095 trained in 0.94 seconds
    6_Default_RandomForest rmse 3.892611 trained in 3.99 seconds
    * Step ensemble will try to check up to 1 model
    Ensemble rmse 3.246669 trained in 0.36 seconds
    AutoML fit time: 37.53 seconds
    AutoML best model: Ensemble
best modelはEnsemble(アンサンブル)モデルのようです。
# テストデータにモデルを適用し住宅価格の予測をする
pred = automl.predict_all(X_test)
# 予測結果の確認
pred.head()
prediction 0 30.853287 1 30.393302 2 20.697733 3 19.150123 4 19.773235
# 予測結果と正解データの比較
from matplotlib import pyplot as plt
plt.plot(y_test, pred.prediction,'.')
plt.xlabel("True value")
plt.ylabel("Predicted value")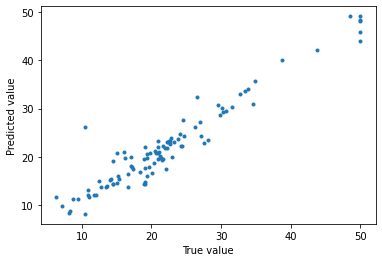
直線上にプロットが並んでいるのでかなり精度よく予測できているようです。
# 精度確認
from sklearn.metrics import mean_absolute_error
from sklearn.metrics import mean_squared_error
print("MAE(test)", str(mean_absolute_error(y_test, pred.prediction)))
print("RMSE(test)",str(np.sqrt(mean_squared_error(y_test, pred.prediction))))
    MAE(test) 1.8143875761288382
    RMSE(test) 2.769616663609779
旧ブログの取り組んでいた結果より精度がいいようです。少しショックです。
精度比較
xgboost (gridsearchあり)
旧ブログでボストンの住宅価格のデータセットで色々なモデルを試しました。その中でもxgboost(グリッドサーチあり)が一番精度がよかったのでautomlとの比較対象とします。
結果:
MAE(test) 2.07
RMSE(test) 2.89
mljar
結果:
MAE(test): 1.81
RMSE(test) 2.76
mljarの方がMAEとRMSE両方とも精度がいいですね。
エラー対応まとめ
mljarの環境を作成しているときに遭遇したエラーと解決方法です。
Library not loaded: /usr/local/opt/libomp/lib/libomp.dylib
→ brew install libomp で解決 (※ avoid version 12 and 13)
workaroundがautogluonの公式サイトに記載されているのでご確認ください。
WARNING: Do not install LibOMP via “brew install libomp” as LibOMP 12 and 13 can cause segmentation faults with LightGBM and XGBoost. 引用: https://auto.gluon.ai/stable/index.html
LightGBM is incompatible with libomp 12 and 13 on macOS 引用: https://github.com/microsoft/LightGBM/issues/4229
IProgress not found. Please update jupyter and ipywidgets. See https://ipywidgets.readthedocs.io/en/stable/user_install.html
→ python3 -m jupyter nbextension enable --py widgetsnbextension で解決?
まとめ
今回長くなってしまったのでmljarのみのご紹介になりました。次回はautogluonの環境構築をしたいと思います。