今回は[Mac] Pythonの仮想環境をvenvで作成する方法の応用版になります。
jupyter notebook内で複数の仮想環境を切り替えて利用できるようにする方法をまとめました。
図にすると下記のようになります。
図1:
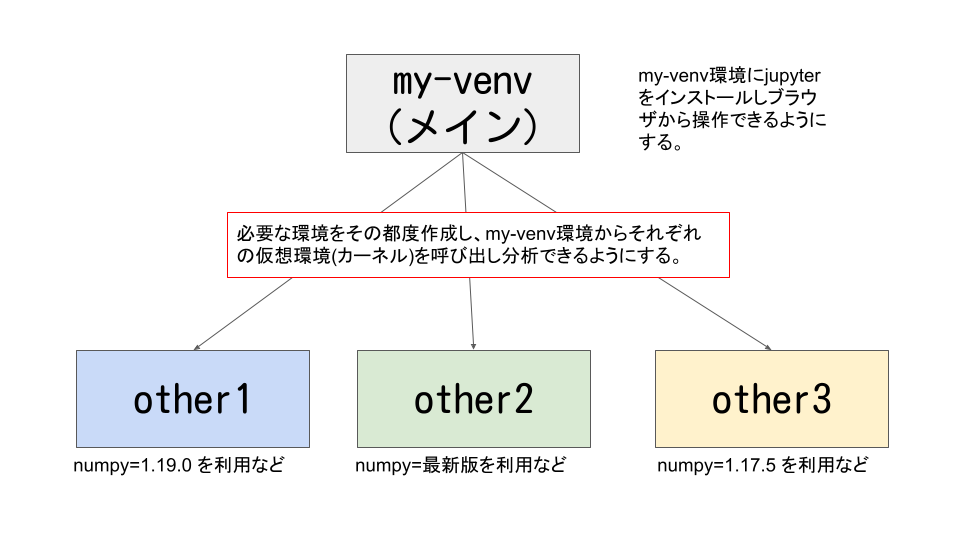
メイン環境のmy-venv環境にjupyterをインストールし、other1 ~ other3までの環境を切り替えられるようにします。(my-venv環境も共存可能)
どういう場合に利用するのか
分析をしていく中で、特定のライブラリをインストールしたとき他のライブラリと競合する場合があると思います。
例えばライブラリAはnumpy 1.19.5以下に依存してるが、ライブラリBはnumpy 1.20.0以上に依存している場合などです。
この場合、二つのライブラリA&Bは共存することが出来ないので仮想環境をライブラリA用(other1)とライブラリB用(other2)の2つを作成するといったことが発生します。(メイン環境(my-venv)にライブラリA、サブ環境にライブラリB(other1)をインストールでも可能)
仮想環境を分けることはいいのですが、jupyter notebookやjupyterlabで分析したい場合、それぞれの仮想環境でpip install jupyterをしてjupyter notebookを起動している人もいるかも知れません。
この方法ですと管理が複雑になるし扱いづらいので、なるべく1つのjupyterから複数の仮想環境を切り替える方法をおすすめします。
メインの仮想環境(my-venv)の作成
# my-venvという名前の仮想環境を作成
python3 -m venv my-venv
# activateにする
source my-venv/bin/activate
# pipのアップグレード
(my-venv) % python3 -m pip install --upgrade pip
Collecting pip
  Using cached https://files.pythonhosted.org/packages/96/2f/caec18213f6a67852f6997fb0673ae08d2e93d1b81573edb93ba4ef06970/pip-22.1.2-py3-none-any.whl
Installing collected packages: pip
  Found existing installation: pip 19.2.3
    Uninstalling pip-19.2.3:
      Successfully uninstalled pip-19.2.3
Successfully installed pip-22.1.2
# jupyterのインストール
(my-venv) % python3 -m pip install jupyterCollecting jupyter Using cached jupyter-1.0.0-py2.py3-none-any.whl (2.7 kB) Collecting ipykernel Using cached ipykernel-6.13.0-py3-none-any.whl (131 kB) ・・・省略・・・ Successfully installed MarkupSafe-2.1.1 Send2Trash-1.8.0 appnope-0.1.3 argon2-cffi-21.3.0 argon2-cffi-bindings-21.2.0 asttokens-2.0.5 attrs-21.4.0 backcall-0.2.0 beautifulsoup4-4.11.1 bleach-5.0.0 cffi-1.15.0 debugpy-1.6.0 decorator-5.1.1 defusedxml-0.7.1 entrypoints-0.4 executing-0.8.3 fastjsonschema-2.15.3 importlib-resources-5.7.1 ipykernel-6.13.0 ipython-8.4.0 ipython-genutils-0.2.0 ipywidgets-7.7.0 jedi-0.18.1 jinja2-3.1.2 jsonschema-4.6.0 jupyter-1.0.0 jupyter-client-7.3.1 jupyter-console-6.4.3 jupyter-core-4.10.0 jupyterlab-pygments-0.2.2 jupyterlab-widgets-1.1.0 matplotlib-inline-0.1.3 mistune-0.8.4 nbclient-0.6.4 nbconvert-6.5.0 nbformat-5.4.0 nest-asyncio-1.5.5 notebook-6.4.11 packaging-21.3 pandocfilters-1.5.0 parso-0.8.3 pexpect-4.8.0 pickleshare-0.7.5 prometheus-client-0.14.1 prompt-toolkit-3.0.29 psutil-5.9.1 ptyprocess-0.7.0 pure-eval-0.2.2 pycparser-2.21 pygments-2.12.0 pyparsing-3.0.9 pyrsistent-0.18.1 python-dateutil-2.8.2 pyzmq-23.1.0 qtconsole-5.3.0 qtpy-2.1.0 six-1.16.0 soupsieve-2.3.2.post1 stack-data-0.2.0 terminado-0.15.0 tinycss2-1.1.1 tornado-6.1 traitlets-5.2.2.post1 wcwidth-0.2.5 webencodings-0.5.1 widgetsnbextension-3.6.0 zipp-3.8.0
後ほど確認するためにmy-venv環境にはpandasをインストールしておきます。
# pandasのインストール
(my-venv) % python3 -m pip install pandas
Collecting pandas
  Downloading pandas-1.4.2-cp38-cp38-macosx_10_9_x86_64.whl (11.0 MB)
     ━━━━━━━━━━━━━━━━━━━━━━━━━━━━━━━━━━━━━━━━ 11.0/11.0 MB 15.5 MB/s eta 0:00:00
Requirement already satisfied: python-dateutil>=2.8.1 in ./my-venv/lib/python3.8/site-packages (from pandas) (2.8.2)
Collecting numpy>=1.18.5
  Using cached numpy-1.22.4-cp38-cp38-macosx_10_15_x86_64.whl (17.6 MB)
Collecting pytz>=2020.1
  Downloading pytz-2022.1-py2.py3-none-any.whl (503 kB)
     ━━━━━━━━━━━━━━━━━━━━━━━━━━━━━━━━━━━━━━━━ 503.5/503.5 kB 11.4 MB/s eta 0:00:00
Requirement already satisfied: six>=1.5 in ./my-venv/lib/python3.8/site-packages (from python-dateutil>=2.8.1->pandas) (1.16.0)
Installing collected packages: pytz, numpy, pandas
Successfully installed numpy-1.22.4 pandas-1.4.2 pytz-2022.1
これで一旦、メイン環境(my-venv)の準備は完了。
# deactivateコマンドでmy-venv環境から抜け出します
deactivate切替用の仮想環境(other1,other2,other3)の作成
仮想環境の作成
# 3つ一気に作成
python3 -m venv other1
python3 -m venv other2
python3 -m venv other3
pipのアップデートと確認用に異なるバージョンのnumpyのインストール
1つずつの仮想環境にactivateしてコマンド実行するのは大変なので、直接それぞれの仮想環境内のpythonを呼び出して作業してみます。
# pipのアップグレード
other1/bin/python3 -m pip install --upgrade pip
other2/bin/python3 -m pip install --upgrade pip
other3/bin/python3 -m pip install --upgrade pip

#確認用にnumpyのインストール
other1/bin/python3 -m pip install numpy==1.19.0
other2/bin/python3 -m pip install numpy
other3/bin/python3 -m pip install numpy==1.17.5アウトプットは割愛します。
jupyterからIPythonカーネルを呼び出せるようにする
my-venvのjupyter notebookからother1 ~ other3の仮想環境を選択できるようにします。
jupyterは裏側でIPythonカーネルという単独のプロセスがPythonコードなどを実行するために動いているようです。(pip install jupyterをしたときにipykernelも依存関係でインストールされていました。)
The IPython kernel is the Python execution backend for Jupyter.
引用: https://ipython.readthedocs.io/en/stable/install/kernel_install.html
それぞれの仮想環境ごとに別々のIPythonカーネルを準備してメインのjupyterで読み込んであげることによって複数の仮想環境を使い分けることが可能になるようです。
All the other interfaces—the Notebook, the Qt console, ipython console in the terminal, and third party interfaces—use the IPython Kernel. This is a separate process which is responsible for running user code, and things like computing possible completions.引用:https://ipython.org/ipython-doc/3/development/how_ipython_works.html
仮想環境other1~other3にipykernelをインストール
# 仮想環境にipykernelのインストール
other1/bin/python3 -m pip install ipykernel
other2/bin/python3 -m pip install ipykernel
other3/bin/python3 -m pip install ipykernel
kernelspecファイルのインストール
# jupyterから読み込めるように、それぞれのipykernelのkernelspecファイルをインストール
other1/bin/python3 -m ipykernel install --user --name other1 --display-name "Python (other1)"
other2/bin/python3 -m ipykernel install --user --name other2 --display-name "Python (other2)"
other3/bin/python3 -m ipykernel install --user --name other3 --display-name "Python (other3)"Installed kernelspec other1 in /Users/hinomaruc/Library/Jupyter/kernels/other1 Installed kernelspec other2 in /Users/hinomaruc/Library/Jupyter/kernels/other2 Installed kernelspec other3 in /Users/hinomaruc/Library/Jupyter/kernels/other3
other1~other3のカーネルスペックファイルがインストールされました。
こちらの情報をjupyterが読み込んでくれるようです。
# インストールされたカーネルスペックを確認する
my-venv/bin/activate/jupyter kernelspec listAvailable kernels: other1 /Users/hinomaruc/Library/Jupyter/kernels/other1 other2 /Users/hinomaruc/Library/Jupyter/kernels/other2 other3 /Users/hinomaruc/Library/Jupyter/kernels/other3 python3 /Users/hinomaruc/Desktop/blog/my-venv/share/jupyter/kernels/python3
無事参照できていそうです。
jupyterの起動と動作確認
# my-venvのjupyter notebookを起動
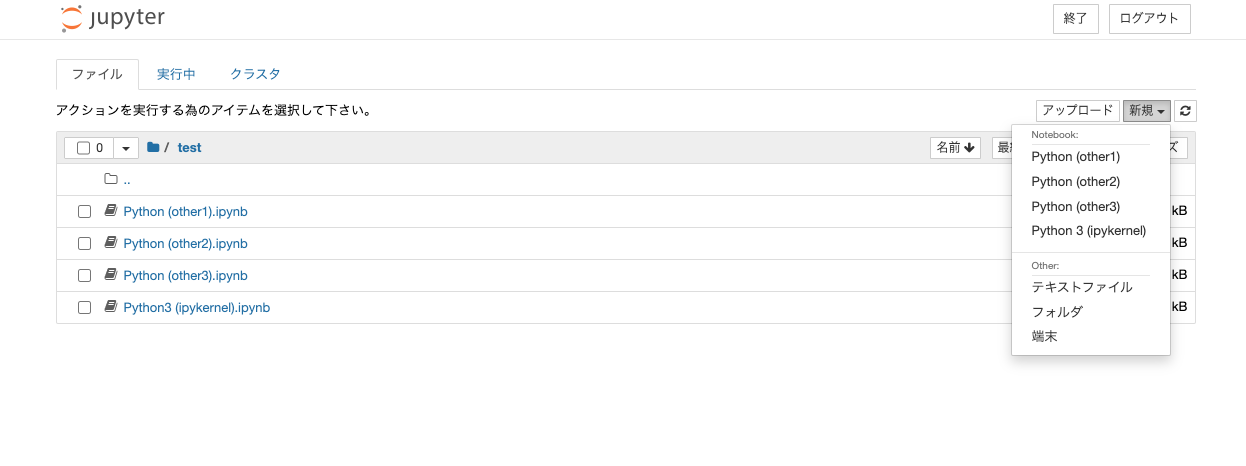
my-venv/bin/python3 -m jupyter notebook右上の新規ボタンをクリックすると、other1 ~ other3の環境を選択できるようになっています。「Python (ipykernel)」はmy-venvのカーネルです。
図2:
まずはメイン環境であるmy-venvから確認してみます。
図3: Python (ipykernel)
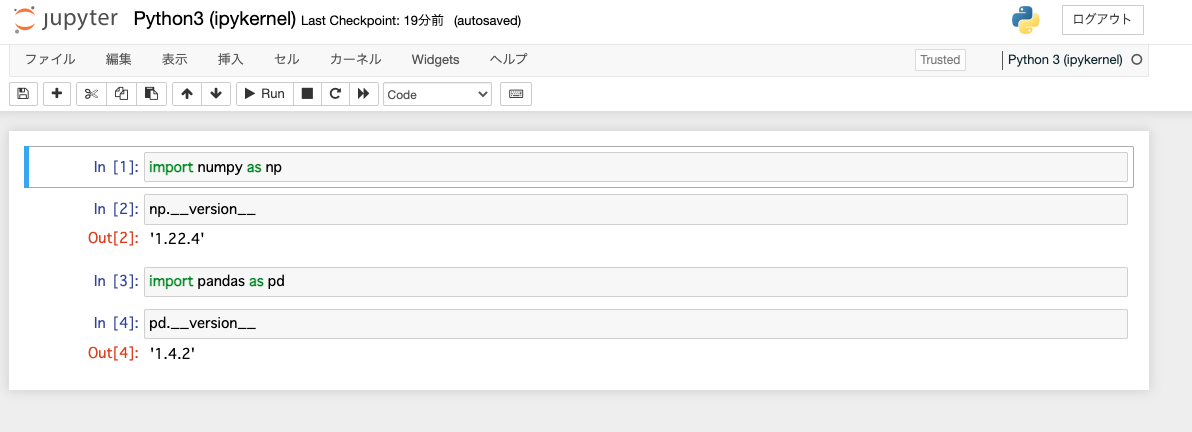
想定通りです。pandasがインストールされているようです。numpyはpandasをインストールすると依存関係でインストールされます。
図4: Python (other1)
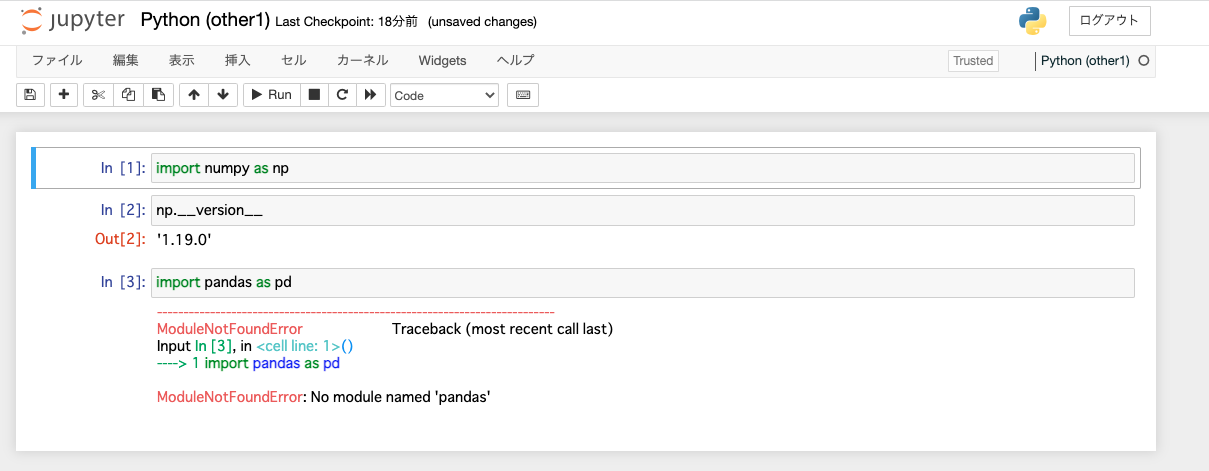
numpyのバージョンは1.19.0でpandasはインストールされていませんので想定通りです。
図5: Python (other2)
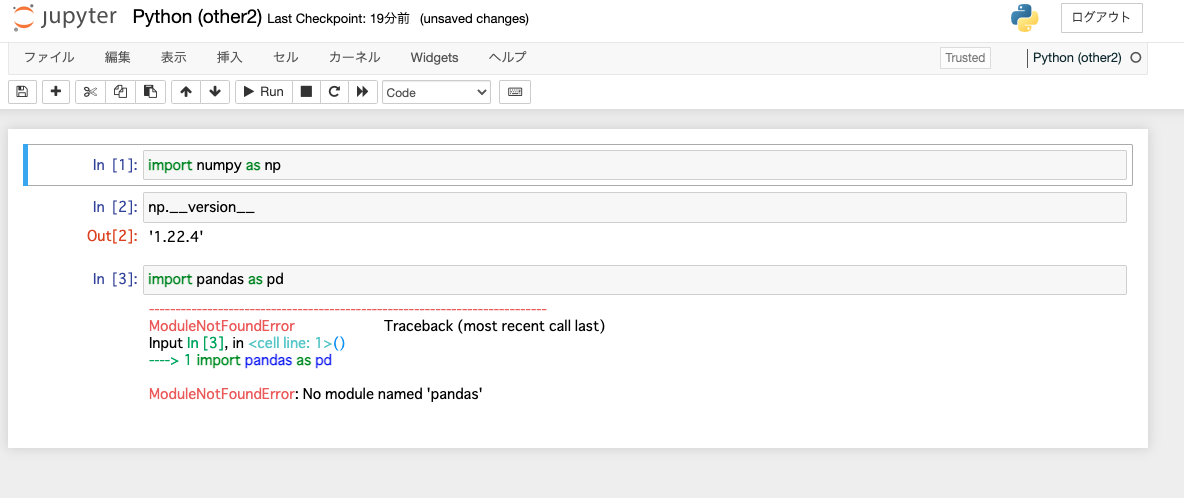
numpyのバージョンは現在の最新版でpandasはインストールされていませんので想定通りです。
図6: Python (other3)
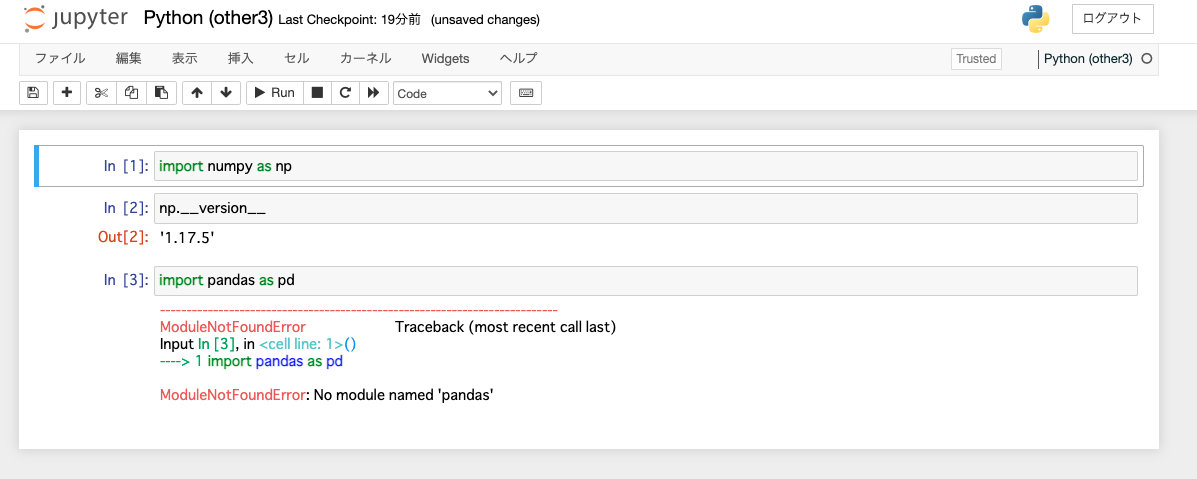
numpyのバージョンは1.17.5でpandasはインストールされていませんので想定通りです。
kernelspecファイルの削除方法
jupyter kernelspec uninstall other1Kernel specs to remove: other1 /Users/hinomaruc/Library/Jupyter/kernels/other1 Remove 1 kernel specs [y/N]: y
other1が削除されたと思います。
ちなみにjupyter kernelspec listでインストール済みのカーネルスペック一覧を確認できます。
まとめ
いかがでしたでしょうか?
依存関係がややこしいdeep leaning系のライブラリも環境を分けることによって作業しやすくなるのではないかと思います。
次回はautomlの仮想環境を作成してみようと思います。