物体検知は広く汎用的に使えるサービスです。農業からウェブサイトまで実に様々な所で活用されています。
色々やりたいことはあるのですが、物体検知シリーズとして下記をやっていこうと思います。
- 物体検知 (とりあえずベースになるものを作成)
- 物体検知の結果表示 (bbox, instance segmentationなど)
- 物体検知の精度確認 (特定の領域だけ検知結果の精度を見るなど実業務に使えそうなやり方を模索する)
- 物体検知APIの作成 (画像をサーバーに渡し、検知結果をJSON形式で戻すだけ)
- 物体検知デスクトップアプリの作成 (画像読み込んでモデル適用した結果を表示するだけ)
今回はリアルタイム物体検知モデルとして有名なYOLOシリーズの(23年4月10日時点で)一番新しいバージョン8を試してみたいと思います。
頻繁に新しいバージョンが発表されるので数ヶ月後にはYOLOv9とかが出ているかも知れません 笑
YOLOの歴史
UltralyticsのページにてYOLOシリーズの歴史についてまとめられていました。
YOLO (You Only Look Once), a popular object detection and image segmentation model, was developed by Joseph Redmon and Ali Farhadi at the University of Washington. Launched in 2015, YOLO quickly gained popularity for its high speed and accuracy.
YOLOv2, released in 2016, improved the original model by incorporating batch normalization, anchor boxes, and dimension clusters.
YOLOv3, launched in 2018, further enhanced the model's performance using a more efficient backbone network, multiple anchors and spatial pyramid pooling.
YOLOv4 was released in 2020, introducing innovations like Mosaic data augmentation, a new anchor-free detection head, and a new loss function.
YOLOv5 further improved the model's performance and added new features such as hyperparameter optimization, integrated experiment tracking and automatic export to popular export formats.
YOLOv6 was open-sourced by Meituan in 2022 and is in use in many of the company's autonomous delivery robots.
YOLOv7 added additional tasks such as pose estimation on the COCO keypoints dataset.
引用: https://docs.ultralytics.com/#yolo-a-brief-history
YOLOv7までについてなんとなくどういう改善が行われてきたか分かりました。
YOLOv8では過去のYOLOシリーズより性能を向上させるため、新しいバックボーンネットワーク、新しいアンカーフリー・スプリットヘッド、そして新しい損失関数などを採用したとのことです。結果としてよりサイズが小さくて高速で精度の良いモデルになったと記載がされていました。
YOLOv8 is designed with a strong focus on speed, size, and accuracy, making it a compelling choice for various vision AI tasks. It outperforms previous versions by incorporating innovations like a new backbone network, a new anchor-free split head, and new loss functions. These improvements enable YOLOv8 to deliver superior results, while maintaining a compact size and exceptional speed.
引用: https://docs.ultralytics.com/#ultralytics-yolov8
YOLOv8について
まず始めるには
公式サイトに何から始めたらいいのか指針があります。
まずは、YOLOv8を使う環境を整えること、次に画像や動画に対してYOLOv8モデルを適用してみること、その次に自分のデータセットでYOLOv8モデルを作成すること、最後にdetection以外のタスク (segmentation、classification、pose)を試してみることのようです。

YOLOv8で使用できるモードの説明
6つのモードが存在するようです。
・「Train」は独自のデータセットでYOLOv8モデルを作成するモードです。
・「Val」は学習後のYOLOv8モデルを検証するためのモードです。
・「Predict」は学習済みのYOLOv8モデルを画像や動画に適用し予測や推論するためのモードです。
・「Export」はYOLOv8モデルを他のフォーマットにエクスポートするためのモードです。他のフォーマットに変換することで推論スピードがアップするなどのメリットがあります。
・「Track」はYOLOv8モデルを使って物体トラッキングをリアルタイムで行うためのモードです。
・「Benchmark」はエクスポートしたYOLOv8モデルの速度や正確さをベンチマークするためのモードです。
Train: For training a YOLOv8 model on a custom dataset.
Val: For validating a YOLOv8 model after it has been trained.
Predict: For making predictions using a trained YOLOv8 model on new images or videos.
Export: For exporting a YOLOv8 model to a format that can be used for deployment.
Track: For tracking objects in real-time using a YOLOv8 model.
Benchmark: For benchmarking YOLOv8 exports (ONNX, TensorRT, etc.) speed and accuracy.
引用: https://docs.ultralytics.com/modes/
実行可能なタスクと事前学習済みモデル
YOLOv8では「detection」、「segmentation」、「classification」、「pose estimation」という4つのタスクを実行可能です。
YOLOv8 is an AI framework that supports multiple computer vision tasks. The framework can be used to perform detection, segmentation, classification, and pose estimation. Each of these tasks has a different objective and use case.
引用: https://docs.ultralytics.com/tasks/
それぞれ事前学習済みのモデルが用意されています。
・事前学習済みモデルの一覧
Available Models:
Detection - yolov8n, yolov8s, yolov8m, yolov8l, yolov8x
Instance Segmentation - yolov8n-seg, yolov8s-seg, yolov8m-seg, yolov8l-seg, yolov8x-seg
Classification - yolov8n-cls, yolov8s-cls, yolov8m-cls, yolov8l-cls, yolov8x-cls
Pose - yolov8n-pose, yolov8s-pose, yolov8m-pose, yolov8l-pose, yolov8x-pose, yolov8x-pose-p6
引用: https://github.com/ultralytics/ultralytics/tree/main/ultralytics/models#1-yolov8
YOLOv8と他のYOLOのバージョンの精度や性能を比較したエビデンスはUltralyticsのgithubページに載っています。
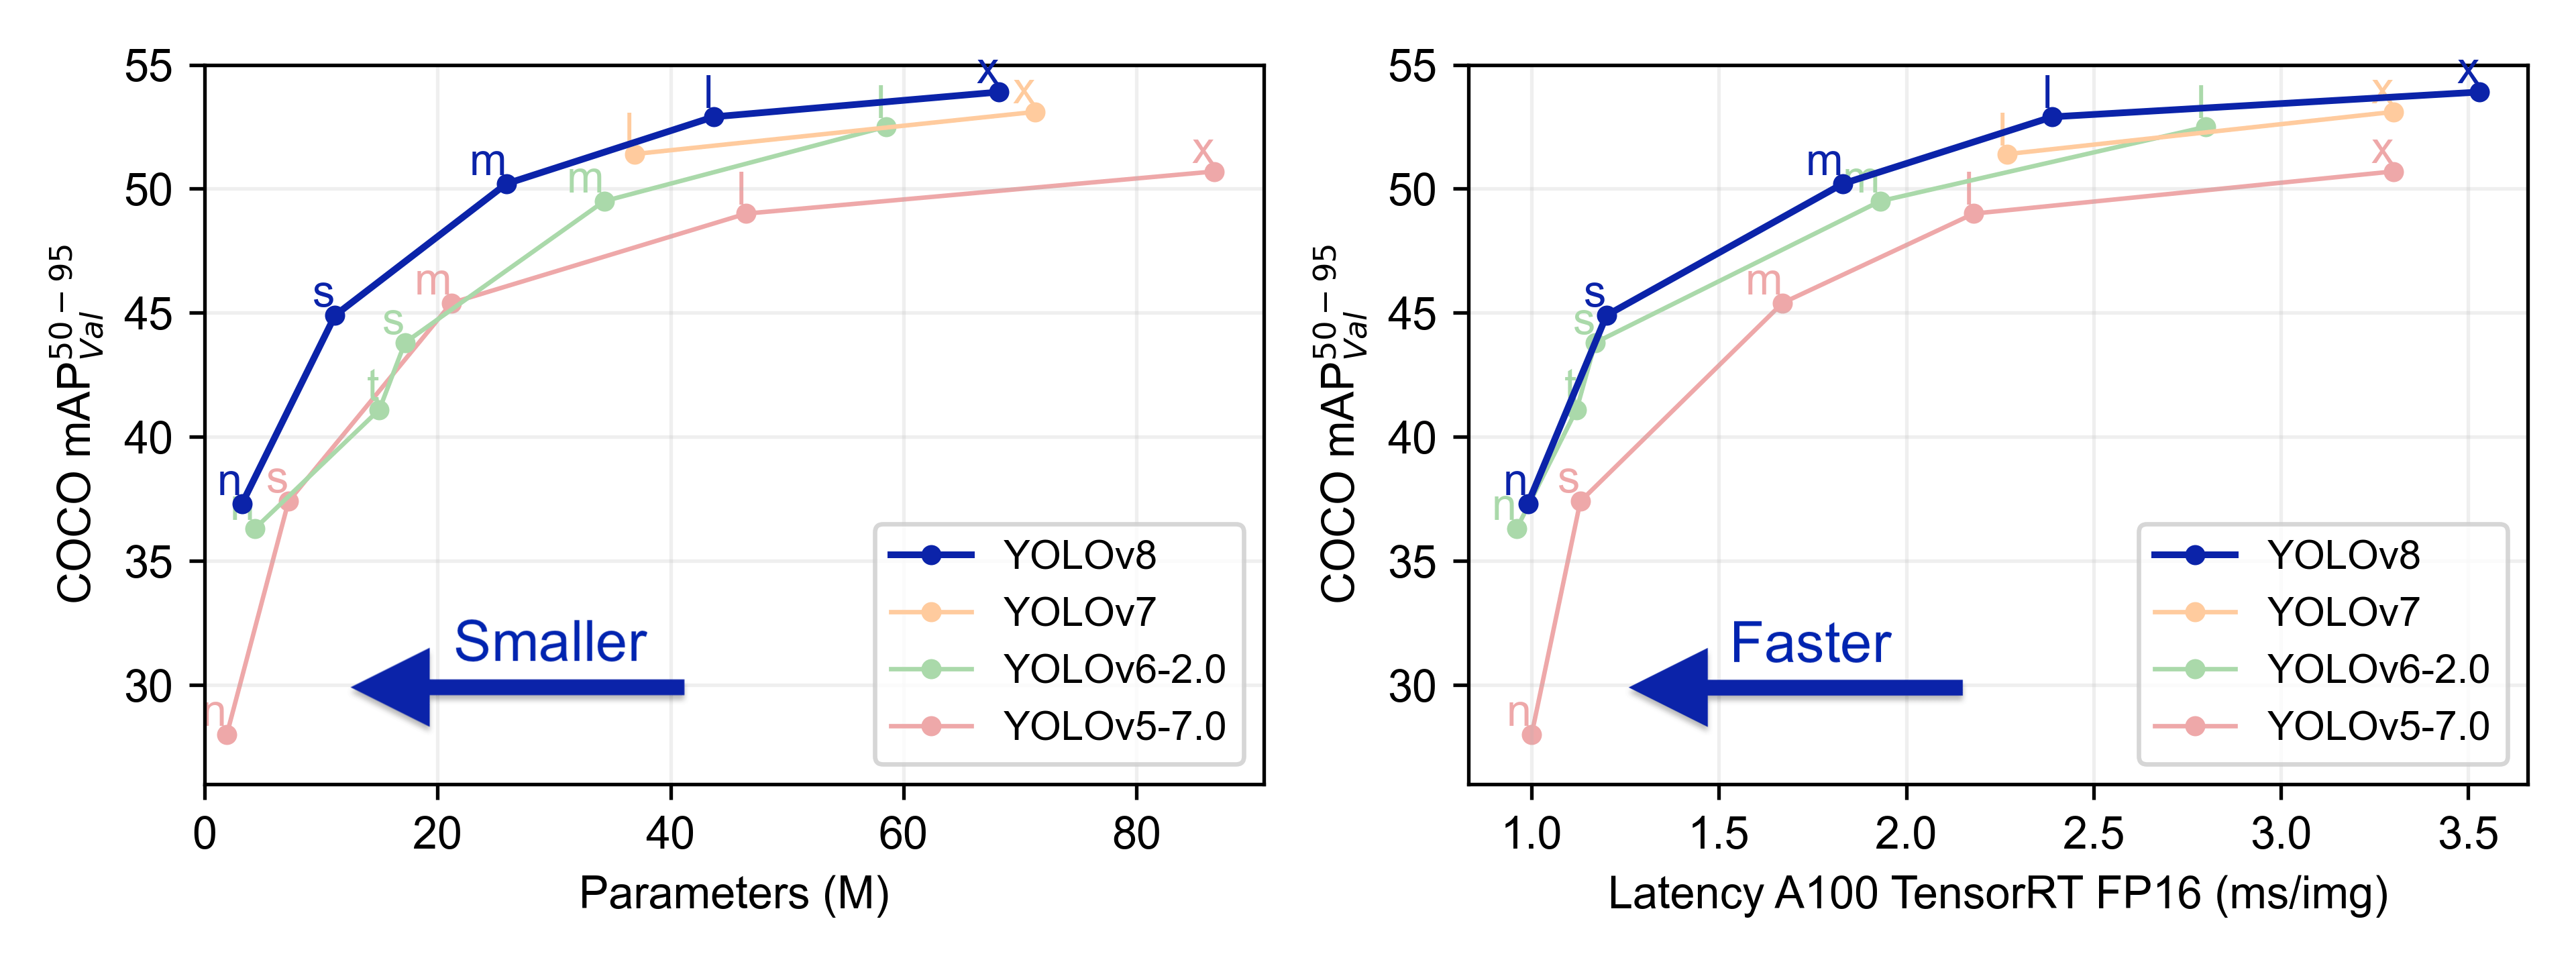
n,s,m,l,xという表記については、YOLOv8では事前にCOCOデータセットやImageNetデータセットで学習済みのモデル(軽さ重視や精度重視など)が用意されているのでそれぞれのモデルを指しています。おそらくですが、nはnano、sはsmall、mはmedium、lはlarge、xはextra-largeの略でしょうか。
上記の比較結果を確認する限り、n~mのモデルに関してはYOLOv8が優秀そうです。lとxのモデルに関してはYOLOv7の方が若干精度がYOLOv8より低いですが速度的には速いようです。個人的には物体検知を実行する環境にもよりますが、「yolov8l」が精度も良く速度もそこそこなので良さそうかなという所感を持ちました。
下記表は「detection用」のモデルの性能まとめになりますが、segmentationやclassification用のモデルの性能まとめは「pre-trained-model-architectures」にありました。

YOLOv8の環境準備
brew intall python@3.7
python3.7 -m venv venv-yolov8
source venv-yolov8/bin/activate
(venv-yolov8) pip install pip -U
(venv-yolov8) pip install wheel setuptools
(venv-yolov8) pip install ipykernel
(venv-yolov8) git clone https://github.com/ultralytics/ultralytics
(venv-yolov8) cd ultralytics
(venv-yolov8) pip install -e '.[dev]' # or pip install ultralyticsでもOK
(venv-yolov8) pip install lap pafy youtube_dl==2020.12.2 #インストールされてなかった。Traking Taskで必要
(venv-yolov8) python3 -m ipykernel install --user --name venv-yolov8 --display-name "venv-yolov8"基本的にはpip install ultralyticsでOKです。Python3.7を使っていますが、3.8や3.9でも問題ありません。(23年4月11日現在)
Install
Pip install the ultralytics package including all requirements in a Python>=3.7 environment with PyTorch>=1.7.
引用: https://github.com/ultralytics/ultralytics
使用画像
画像はDALL-Eで生成したものを使います。猫と犬の画像を生成しました。
# フォルダ内の画像を取得し、グリッド表示する関数
# 引数: folder_path: フォルダへのフルパス
def display_images(folder_path):
    import os
    from PIL import Image
    from IPython.display import display

    path = folder_path

    # フォルダ内のイメージの取得
    image_files = [filename for filename in os.listdir(path) if filename.lower().endswith((".jpg", ".jpeg", ".gif", ".bmp", ".png"))]

    num_images = len(image_files)
    if num_images == 0:
        print("No image files found in the folder.")
        exit()

    # グリッドのための行と列の数を計算
    if num_images <= 3:
        rows, cols = 1, num_images
    else:
        # 列は3つまで
        cols = 3
        rows = (num_images + 2) // 3

    # 各イメージをグリッド状に格納するための大きな箱を用意
    grid_width = cols * 300
    grid_height = rows * 300
    grid_img = Image.new('RGB', (grid_width, grid_height))

    # グリッド状に貼り付け
    for i, filename in enumerate(image_files):
        img_path = os.path.join(path, filename)
        img = Image.open(img_path)
        img.thumbnail((300, 300))  # resize to fit the grid cell
        row = i // cols
        col = i % cols
        x = col * 300
        y = row * 300
        grid_img.paste(img, (x, y))

    # 表示(Jupyter notebook上で表示)
    display(grid_img)

    # 表示(別ウィンドウで表示)
    #grid_img.show()

display_images("/Users/hinomaruc/Desktop/blog/dataset/aidetection")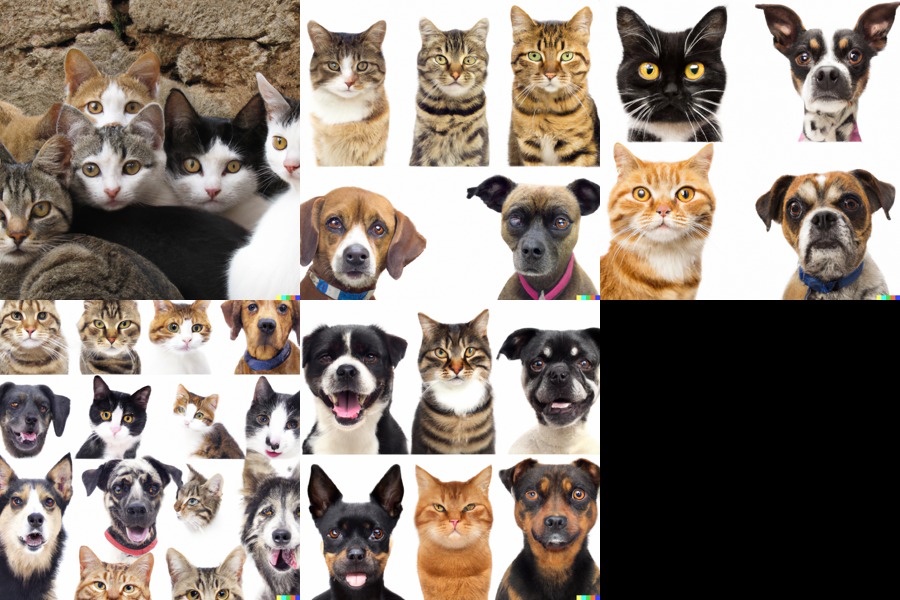
YOLOv8で物体検知を試してみる
それではDALL-Eで作成した画像に対してモデルを適用してみましょう。
from ultralytics import YOLO
from PIL import Image
import cv2

# 事前学習済みのモデルを読み込み(detectionモデルを使用)
model = YOLO('yolov8n.pt')

# predictモードを実行
results = model.predict(source="/Users/hinomaruc/Desktop/blog/dataset/aidetection",
                        project="/Users/hinomaruc/Desktop/blog/dataset/yolov8/runs", # 出力先
                        name="mypredict", #フォルダ名
                        exist_ok=True, #上書きOKか
save=True)image 1/5 /Users/hinomaruc/Desktop/blog/dataset/aidetection/DALL·E 2023-04-04 06.11.13 - ten cats.png: 640x640 2 cats, 411.2ms image 2/5 /Users/hinomaruc/Desktop/blog/dataset/aidetection/DALL·E 2023-04-04 06.13.16 - five real cats and five real dogs.png: 640x640 9 cats, 4 dogs, 1 frisbee, 404.6ms image 3/5 /Users/hinomaruc/Desktop/blog/dataset/aidetection/DALL·E 2023-04-04 06.15.26 - 3 real looking cats and 3 real looking dogs.png: 640x640 3 cats, 2 dogs, 421.6ms image 4/5 /Users/hinomaruc/Desktop/blog/dataset/aidetection/DALL·E 2023-04-04 06.15.32 - 3 real looking cats and 3 real looking dogs.png: 640x640 2 cats, 4 dogs, 425.9ms image 5/5 /Users/hinomaruc/Desktop/blog/dataset/aidetection/DALL·E 2023-04-04 06.15.40 - 3 real looking cats and 3 real looking dogs.png: 640x640 2 cats, 2 dogs, 454.2ms Speed: 1.9ms preprocess, 423.5ms inference, 2.2ms postprocess per image at shape (1, 3, 640, 640) Results saved to /Users/hinomaruc/Desktop/blog/dataset/yolov8/runs/mypredict
# YOLOv8モデルでdetectした結果を確認
display_images("/Users/hinomaruc/Desktop/blog/dataset/yolov8/runs/mypredict")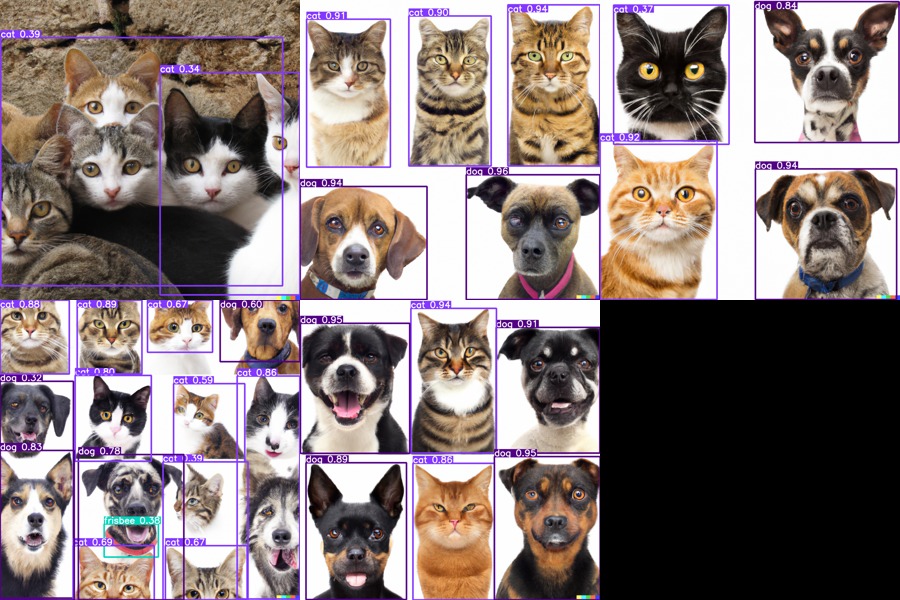
犬の舌がフリスビーだと認識してしまいましたが、全体的に良さそうな結果になりました。
(オプション) predictモードのソースにフォルダ以外を渡す
predictモードのソースには画像パス、PIL、ndarray、リストなどが指定できる
# ローカルの画像へのパス
results = model.predict(source="/Users/hinomaruc/Desktop/blog/dataset/aidetection/DALL·E 2023-04-04 06.11.13 - ten cats.png")
print("---")

# from PIL
im1 = Image.open("/Users/hinomaruc/Desktop/blog/dataset/justviewimages/cat/a_crowncat129_TP_V4.jpg")
results = model.predict(source=im1)
print("---")

# from ndarray
im2 = cv2.imread("/Users/hinomaruc/Desktop/blog/dataset/justviewimages/cat/b_HIRA15041143_TP_V4.jpg")
results = model.predict(source=im2)
print("---")

#from list of PIL/ndarray
results = model.predict(source=[im1, im2])image 1/1 /Users/hinomaruc/Desktop/blog/dataset/aidetection/DALL·E 2023-04-04 06.11.13 - ten cats.png: 640x640 2 cats, 414.3ms Speed: 1.8ms preprocess, 414.3ms inference, 1.8ms postprocess per image at shape (1, 3, 640, 640) Results saved to /Users/hinomaruc/Desktop/blog/dataset/yolov8/runs/mypredict 4 labels saved to /Users/hinomaruc/Desktop/blog/dataset/yolov8/runs/mypredict/labels --- 0: 448x640 1 cat, 289.7ms Speed: 2.6ms preprocess, 289.7ms inference, 1.6ms postprocess per image at shape (1, 3, 640, 640) Results saved to /Users/hinomaruc/Desktop/blog/dataset/yolov8/runs/mypredict 4 labels saved to /Users/hinomaruc/Desktop/blog/dataset/yolov8/runs/mypredict/labels --- 0: 448x640 1 cat, 304.1ms Speed: 1.9ms preprocess, 304.1ms inference, 1.9ms postprocess per image at shape (1, 3, 640, 640) Results saved to /Users/hinomaruc/Desktop/blog/dataset/yolov8/runs/mypredict 4 labels saved to /Users/hinomaruc/Desktop/blog/dataset/yolov8/runs/mypredict/labels --- 0: 448x640 1 cat, 1: 448x640 1 cat, 567.0ms Speed: 3.2ms preprocess, 283.5ms inference, 1.7ms postprocess per image at shape (1, 3, 640, 640) Results saved to /Users/hinomaruc/Desktop/blog/dataset/yolov8/runs/mypredict 4 labels saved to /Users/hinomaruc/Desktop/blog/dataset/yolov8/runs/mypredict/labels
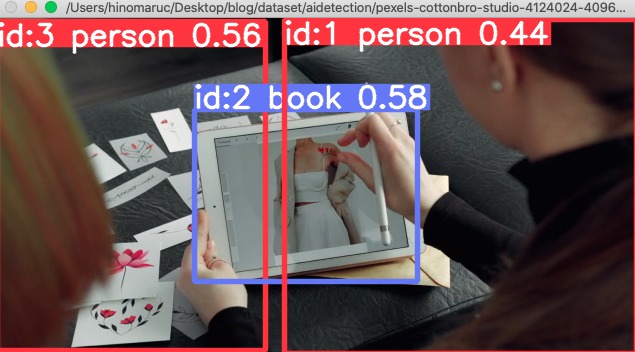
YOLOv8でTrackingを試す
よく見る物体がAIで検知されている様子を、動画をインプットにして見てみたいと思います。
サンプルだとyoutubeの動画をソースにすればそのまま読み込めるようでしたが、私の環境だとなぜかOpenCV: Couldn't read video stream from file というエラーがでて動かなかったので、サンプル動画をダウンロードしてきて読み込んだら動作しました。
サンプル動画はPexelsというサイトの「hands-creative-flowers-ipad-4124024」をダウンロードし使わせてもらっています。(ちょっと画質が良すぎて動作が重かったので落としました。)
from ultralytics import YOLO

# Load a model (detectionモデルを使います)
model = YOLO('yolov8n.pt')  # load an official detection model

# セグメンテーションしたい場合はこちらを使う (detectionモデルより重いです)
# model = YOLO('yolov8n-seg.pt')  # load an official segmentation model

# Track with the model
results = model.track(source="/Users/hinomaruc/Desktop/blog/dataset/aidetection_video/pexels-cottonbro-studio-4124024-4096x2160-50fps.mov", show=True, tracker="botsort.yaml")
    WARNING ⚠️ stream/video/webcam/dir predict source will accumulate results in RAM unless stream=True is passed,
    causing potential out-of-memory errors for large sources or long-running streams/videos.

    Usage:
        results = model(source=..., stream=True)  # generator of Results objects
        for r in results:
            boxes = r.boxes  # Boxes object for bbox outputs
            masks = r.masks  # Masks object for segment masks outputs
            probs = r.probs  # Class probabilities for classification outputs

video 1/1 (1/821) /Users/hinomaruc/Desktop/blog/dataset/aidetection_video/pexels-cottonbro-studio-4124024-4096x2160-50fps.mov: 352x640 1 person, 498.8ms
video 1/1 (2/821) /Users/hinomaruc/Desktop/blog/dataset/aidetection_video/pexels-cottonbro-studio-4124024-4096x2160-50fps.mov: 352x640 1 person, 262.5ms
video 1/1 (3/821) /Users/hinomaruc/Desktop/blog/dataset/aidetection_video/pexels-cottonbro-studio-4124024-4096x2160-50fps.mov: 352x640 1 person, 229.4ms
・・・省略・・・
まとめ
とりあえずYOLOv8を使ってみました。簡単に物体検知が出来て、精度も良いとなるとどんどん活用したくなりますね。